Introduction
In previous posts, I showed how to:
-
Have a local PowerShell environment using the new Az module that works fine.
We will use Az module for the scripts of this tutorial. -
Request Graph with PowerShell to get Azure AD Audit logs, using a Service Principal credentials and permissions.
In this post, we have understood the need to store the Azure AD audit logs for years for security concerns because they are flushed, at best every 30 days. This has been done using a storage solution. Microsoft offers several manual solutions but only the blob solution can store the logs for years and as the blobs are nested in different folders hourly, it is not the best solution to parse the logs later if needed. An Azure Storage Account table will be more useful to display the Azure AD Activity archived logs if needed for security concerns. - Use the AzureADPreview PowerShell module locally to get Azure AD Audit logs. I showed how easy it is to use the preview module to quicly get the Azure AD activity logs (Audit and Sign-ins).
Design
The PowerShell script will:
-
create resources:
- a Storage Account,
- a Storage Table in the Storage Account,
- an Automation Account,
- a PowerShell RunBook in the Automation Account.
- add credentials and variables to the Automation Account.
- import the code of the runbook from a gist.
- execute the runbook to import the Azure AD Audit logs from Azure Active Directory and store them into the Azure Storage Table.
- display the result of the runbook job.
Prerequisites
To do this tutorial you must:
- Have access to an Azure tenant and to an Azure subscription of that tenant.
- Have a Global Administrator account for that tenant.
- Have the Azure AD Audit logs non empty (you can manually create user in Azure AD if needed or use this post to it using PowerShell).
- Have a local PowerShell environement with new Az module installed and working properly.
Warning:
This is a tutorial. Do not never, ever do what we are going to do in a real IT department:
Now you are aware of that, let's start the tutorial.
- We are going to use the AzureADPreview module the use of which is not allowed for production matters.
- We are going to use the Global Administrator credentials in our runbook that is strictly a bad idea, because, in a real company, if a malicious people can have access to the runbook and change the code (that is quite easy) , this people could perform catastrophies regarding Azure environements in this company.
Now you are aware of that, let's start the tutorial.
Tutorial
1. Connecting to Azure, setting the Subscription, AzContext, ResourceGroup
We need first to connect to Azure. Then we need to define the containers for our resources (Automation Account, runbook, Storage Account, Storage Table).- The Azure Subscription is THE container in Azure. It that gathers all the costs of the resources at a first level, allows users to find the resources and administrators to easily define permissions. It is the main container to store resources in Azure.
- The Azure Resource Group is a sub container within the subscription. It allows users and administrators to gather resources linked by a same project, topic,etc. Most of all, if you remove a resource group you remove all the resources inside of it. Very useful to create a bunch of resources test them and delete them to perform another test without any risk to touch to another resources in the subscription.
- The Azure Context is like an invisible link to a subscription in our PowerShell session. In certain PowerShell cmdlets, we will not be necessarely asked to re-precise the subscription to impact each time. The cmdlet will be sometimes smarter enough to guess the subscription to impact because it is linked to the context. That's why, the context is a very important thing to check or define if needed.
# Will be prompted to sign in via browser
Connect-AzAccount
# check the subsctiption available and choose one to work with
Get-AzSubscription
#define the subscription you want to work with
$subscriptionId="your subscription id"
#Check what iz your AzContext
Get-AzContext
# Use set context if you need to change subscriptions.
Set-AzContext -Subscription $subscriptionId

Notice than, after my connection, my Azure Context was set on my Paas subscription. As I want to perform this tutorial on the Iaas one, I have to change the Context to point on the Iaas subscription.

#New Resource Group
$Location = "francecentral"
$resourceGroupName = "azureADAuditLogs"
New-AzResourceGroup -Name $resourceGroupName -location $Location
If I go to the Portal, the Resource Group exists, but for another subscription.

After the cmdlet success

We can see the new Resource Group in the Azure Portal within the good subscription.

We have all our first level containers now, we can thus create the resources within them.
2. Creating the Automation Account
An Automation Account is both a resource, but also a container for one or several runbooks that can execute code on demand or based on schedule. The Automation Account can provide the runbook(s) with several items:- Variables that the runbook(s) can call and use.
- Credentials (encrypted of course) that the runbook(s) can call and use to authenticate to Azure, Azure AD, etc.
- Code modules that the runbook(s) can import and use.
#New Automation Account
$automationAccountName = "adlogs-automationAccount"
New-AzAutomationAccount -ResourceGroupName $resourceGroupName -Name $automationAccountName -Location $Location -Plan Free

We had a successful confirmation in the Powershell window and we can check that the Automation Account has been created successfully in the portal:

3. Adding modules to the Automation Account
The runbook that we will create later within the Automation Account will have 2 tasks to do:- Connect to Azure Active Directory to import the Audit Logs. There is a PowerShell module AzureADPreview that helps to do this very quicly with a single line cmdlet! Unfortunately, a standard Automation Account doesn't come with this module loaded so we have to import it. This module is in preview so as written previously it is not recommended by Microsoft to use it at work yet.
- Then, export all the logs line by line in an Azure Storage Table. Here again, creating lines in an Azure Storage Table requires a specific module: AzureRMStorageTable. We have to import this module also in our Automation Account.
3.1 Adding module ADPreview to the Automation Account
#Importing AzureADPreview module into Automation Account
$ModuleADPreview = "AzureADPreview"
$uriModuleADPreview = (Find-Module $ModuleADPreview).RepositorySourceLocation + 'package/' + $ModuleADPreview
$uriModuleADPreview
New-AzAutomationModule -Name $ModuleADPreview -ContentLinkUri $uriModuleADPreview -ResourceGroupName $resourceGroupName -AutomationAccountName $automationAccountName
Above are the cmdlets to import the module AzureADPreview, and below, the result of them in the PowerShell window:

As soon as the cmdlet receives a response, we can see in the portal that the module is in a state "Importing":

And soon imported and ready to use:

So now we have 2 versions of the AzureRMStorageTable :

As soon as the cmdlet receives a response, we can see in the portal that the module is in a state "Importing":

And soon imported and ready to use:

3.2 Adding module AzureRMStorageTable to the Automation Account
Regarding this module, there is a somehow tricky explanation to do. This module is one of the most old modules of Azure since we had needed to store data in Storage Tables from the beginning of the portal. However, the version of Azure has increased and the name of the cmdlets also, we had AzureRM, and now Az, but regarding the storage the names stayed the sames. Furthermore, you notice that all our PowerShell cmdlets are based on new PowerShell Az module, but the current (2019-08-26) out-of-the-box Azure runbook created within an automation account is still using the AzureRM module!So now we have 2 versions of the AzureRMStorageTable :
- The latest version (2.0) is compatible with the new module Az and is not compatible with the current (2019-08-26) out-of-the-box Azure runbook that is still using AzureRM . There is, by the way, no module named AzStorageTable.
- the 1.0.0.23 version is compatible with the module AzureRM, and as we are going to use the module AzureRMStorageTable within a runbook we have to import the 1.0.0.23 version of the AzureRMStorageTable because the out-of-the-box Azure runbook at date (2019-08-26) is still baseed on AzureRM.
#Importing AzureRmStorageTable module into Automation Account
$ModuleStorageTable = "AzureRmStorageTable"
$uriModuleStorageTable = (Find-Module $ModuleStorageTable).RepositorySourceLocation + 'package/' + $ModuleStorageTable + '/1.0.0.23'
$uriModuleStorageTable
New-AzAutomationModule -Name $ModuleStorageTable -ContentLinkUri $uriModuleStorageTable -ResourceGroupName $resourceGroupName -AutomationAccountName $automationAccountName
And the result at the execution:
In PowerShell

and in the portal

In PowerShell

and in the portal

4 Adding the credentials to the Automation Account
As written before we are going to add credentials to the Automation Account for them to be used by the runbook, and this will be the Azure Tenant Global Administrator credentials. As written before also, you cannot do this in a real company because is very unsafe, but this is only a tutorial in a demo tenant so for the quickness of the demo we are going to do this here.#New Credentials for the Automation Account $automationCredentialsName = "azureADConnectAccount" New-AzAutomationCredential -Name $automationCredentialsName -ResourceGroupName $resourceGroupName -AutomationAccountName $automationAccountName -Value (Get-Credential)
When running the cmdlet, you are prompted for credentials. Enter the Global Administrator ones.

then you can check the creation in the PowerShell Window and in the Azure Portal:


5. Adding variables to the automation account
the code executed by the runbook will be loaded later from a Gist. The runbook and its code, in order to perform their tasks successfully need information about :- Credentials name
- Subscription where the Storage Table is
- Resource Group of this Subscription
- Storage Account where the Storage Table is
- Storage Table name
Fill the $subscriptionName value with the name of the subscription you work with, the execute the code for the variables creation.
#New variables for the Automation Account
$subscriptionName = ""  #the name of the subscription where you want to create automation account and storage account
New-AzAutomationVariable -AutomationAccountName $automationAccountName -Name "subscriptionName" -Encrypted $False -Value $subscriptionName -ResourceGroupName $resourceGroupName
New-AzAutomationVariable -AutomationAccountName $automationAccountName -Name "resourceGroupName" -Encrypted $False -Value $resourceGroupName -ResourceGroupName $resourceGroupName
New-AzAutomationVariable -AutomationAccountName $automationAccountName -Name "automationCredentialsName" -Encrypted $False -Value $automationCredentialsName -ResourceGroupName $resourceGroupName


5. Creating the Storage Account and the Storage Table
5.2 Storage Account creation
A storage account name has to be unique worldwide, because its name define its Url. To be sure of the unicity of the name for anybody doing this tutorial, I use this trick :your tenant domain name (that is unique worldwide) + suffix + increment number. Everything has to be in lower case.
So fill the value with your tenant domain for the $tenantDomain variable (lowercase) and run the PowerShell cmdlets
#New Storage Acount
$tenantDomain = ""#fill with your tenant domain
$storageAccountNameSuffix = "adlogs2" #increment the number each time you perform a new test (except if you delete the storage account after each test)
$storageaccountname = $tenantDomain + $storageAccountNameSuffix
$StorageAccount = New-AzStorageAccount -ResourceGroupName $resourceGroupName -Name $storageaccountname -Location $location -SkuName Standard_RAGRS -Kind StorageV2
No response in PowerShell when created,...

But it appears in the portal.

5.3 Storage Table creation
For creating the table run the following cmdlets:#New Storage Table $tableName = "azureADAuditLogs" $ctx = $storageAccount.Context New-AzStorageTable -Name $tableName -Context $ctx
Table is created, the unique Url appears in PowerShell. That's why the storage account name has to be unique worldwide.

This is the table view in portal:

5.4 Adding the Storage Account and the Storage Table variables to the Runbook
Now than we have the name of the Storage Account and the Storage Table we can pass them to the runbookNew-AzAutomationVariable -AutomationAccountName $automationAccountName -Name "storageAccountName" -Encrypted $False -Value $storageaccountname -ResourceGroupName $resourceGroupName New-AzAutomationVariable -AutomationAccountName $automationAccountName -Name "tableName" -Encrypted $False -Value $tableName -ResourceGroupName $resourceGroupName


6. Runbook creation
Last resource to create, we will create the runbook while importing its code from my Gist :You can see how the runbook code is:
- Importing the AzureADPreview Powershell module
- getting the credentials from the Automation Account
- connecting to AzureAD
- getting the Azure AD Audit Logs in 1 cmdlet
- connecting then to the Azure tenant
- retrieving the Azure Storage Table
- create a line by AD log an store the log in it
Copy and paste the first line and replace by a path that exists in your loacl machine.
Then, copy and paste the other lines in your PowerShell window and hit enter.
#Importing Runbook code from a public Gist
$runbookCodeFileTempPath = "C:\dev\" #set a path that really exists in your local machine
$runbookName = "exportAzureADAuditLogs"
$runbookCodeFileName = "Test-exportAzureadauditlogs.ps1'"
$runBookContentUri = "https://gist.githubusercontent.com/MarcCharmois/0054fc0e20f26afc3161d9397c16d083/raw/8ac0bf3a7d445aaba8a072c769591582acb83e9b/Store%2520Azure%2520AD%2520Audit%2520logs%2520Runbook%25201"
Invoke-WebRequest -Uri $runBookContentUri -OutFile ($runbookCodeFileTempPath + $runbookCodeFileName)


$params = @{
'Path'                  = $runbookCodeFileTempPath + $runbookCodeFileName
'Description'           = 'export Azure AD Audit logs in a Azure Storage Account Table'
'Name'                  = $runbookName
'Type'                  = 'PowerShell'
'ResourceGroupName'     = $resourceGroupName
'AutomationAccountName' = $automationAccountName
'Published'             = $true
}
#New Runbook for the automation Account

Import-AzAutomationRunbook @params


7. Starting the job, importing the logs, filling the table, reading output
For ending, we just have to start the job, wait for its completion and check remotely the output.Just copy and paste the following code in your PowerShell window and hit enter.
#Starting the Runbook Job
$job = Start-AzAutomationRunbook -Name $runbookName -ResourceGroupName $resourceGroupName -AutomationAccountName $automationAccountName

# Waiting for Job completion
$timeCount = 0
do {
    #loop body instructions
    Start-Sleep -s 1
    $timeCount++
    Write-Output ("waited " + $timeCount + " second(s)")
    $job2 = Get-AzAutomationJob -JobId $job.JobId -ResourceGroupName $resourceGroupName -AutomationAccountName $automationAccountName
    if ($job2.Status -ne "Completed") {
        Write-Output ("job status is " + $job2.Status + " and not completed")
    }
    else {
        Write-Output ("job status is " + $job2.Status + ". Writing Job information and  Output for checking...")
    }
}while ($job2.Status -ne "Completed")
$job2 = Get-AzAutomationJob -JobId $job.JobId -ResourceGroupName $resourceGroupName -AutomationAccountName $automationAccountName
$job2
if ($job2.Exception -eq $null) {
    Write-Output ("job completed with no exceptions")
}
else {
    Write-Output ("job exceptions: " + $job2.Exception)
}

# Full Job output
$jobOutPut = Get-AzAutomationJobOutput -AutomationAccountName $automationAccountName -Id $job.JobId -ResourceGroupName $resourceGroupName -Stream "Any" | Get-AzAutomationJobOutputRecord
$jobOutPut = ($jobOutPut | ConvertTo-Json) | ConvertFrom-Json
$index = 0

foreach ($item in $jobOutPut) {
    $index++
    Write-Output "---------------------------------"
    Write-Output ("output " + $index)
    Write-Output ($item.Value)
}
You should obtain this :
- Job starting
- Loop waiting for job completion
- Output with the Azure Active Directory Audit Logs, and trace of the Azure Storage Table lines creation and filling.


You can the go to the Azure Portal to check that:
a Runbook Job has been completed in the runbook

retrieve the output you saw in the PowerShell window

and most of all, check that the Azure Storage Table is successfully filled!

doing the same in one shot
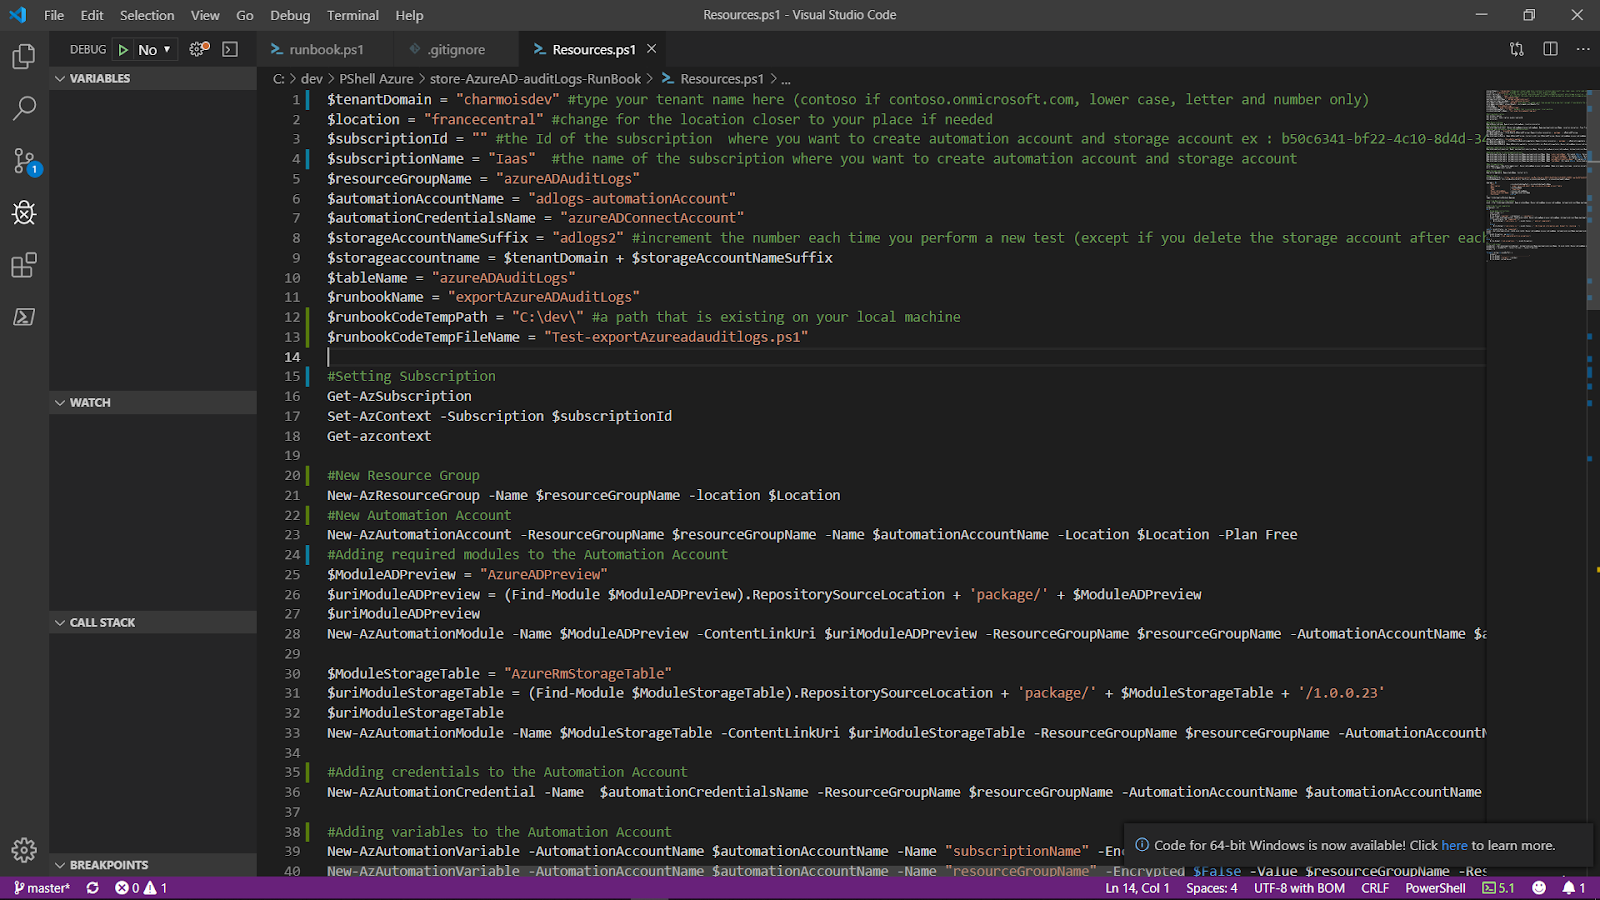
You can find all this in one script in my GitHub repo: store-AzureAD-auditLogs-RunBookIf you want to execute that script in one shot, remove the resource group:
Remove-AzResourceGroup AzureADAuditLogs

and play the script after having change the variable values at the begining of the script.