Friday, September 13, 2019

Build locally a docker image and deploy it to an Azure Web App for containers

Topic

this post shows how to locally build a Docker image on Windows 10 Home version, push it to an Azure Container Registry, then, deploy it manually to a Web App for containers so as it can be consume.

Prerequisites

you must have:
  • an access to the Azure Portal
  • an available Azure Container registry (if not do this quick tutorial to have one)
  • Docker Toolbox
    On Windows 10 home version you won't be allowed to install Docker desktop by the Docker installation program but it will install Docker Toolbox that is enough to do the main tasks.

Building the docker image locally

If you have a github account fork the following repo and clone it on your computer, if not, download the code:
acr-build-helloworld-node


Let's examine the content a bit. First it is a real Node.js application even if it's render only "Hello World". It is a good base for future developments for an API and a good way to test the deployment as a container.


we can see next the files that compose the image. the Dockerfile-base:


The Dockerfile-app:


and most of all the Dockerfile, the only file we really need to build locally a docker image. It tells Docker to:
  • build a machine based on Linux alpine with Node engine included.
  • copy all the files in src folder
  • change directory to src folder and perform an NPM install
  • and the node excution for the API is dedicated to the file server.js located in the src folder
Five lines of code an we have a complete environment running an API! Remember how long it took to have the same with a VM...


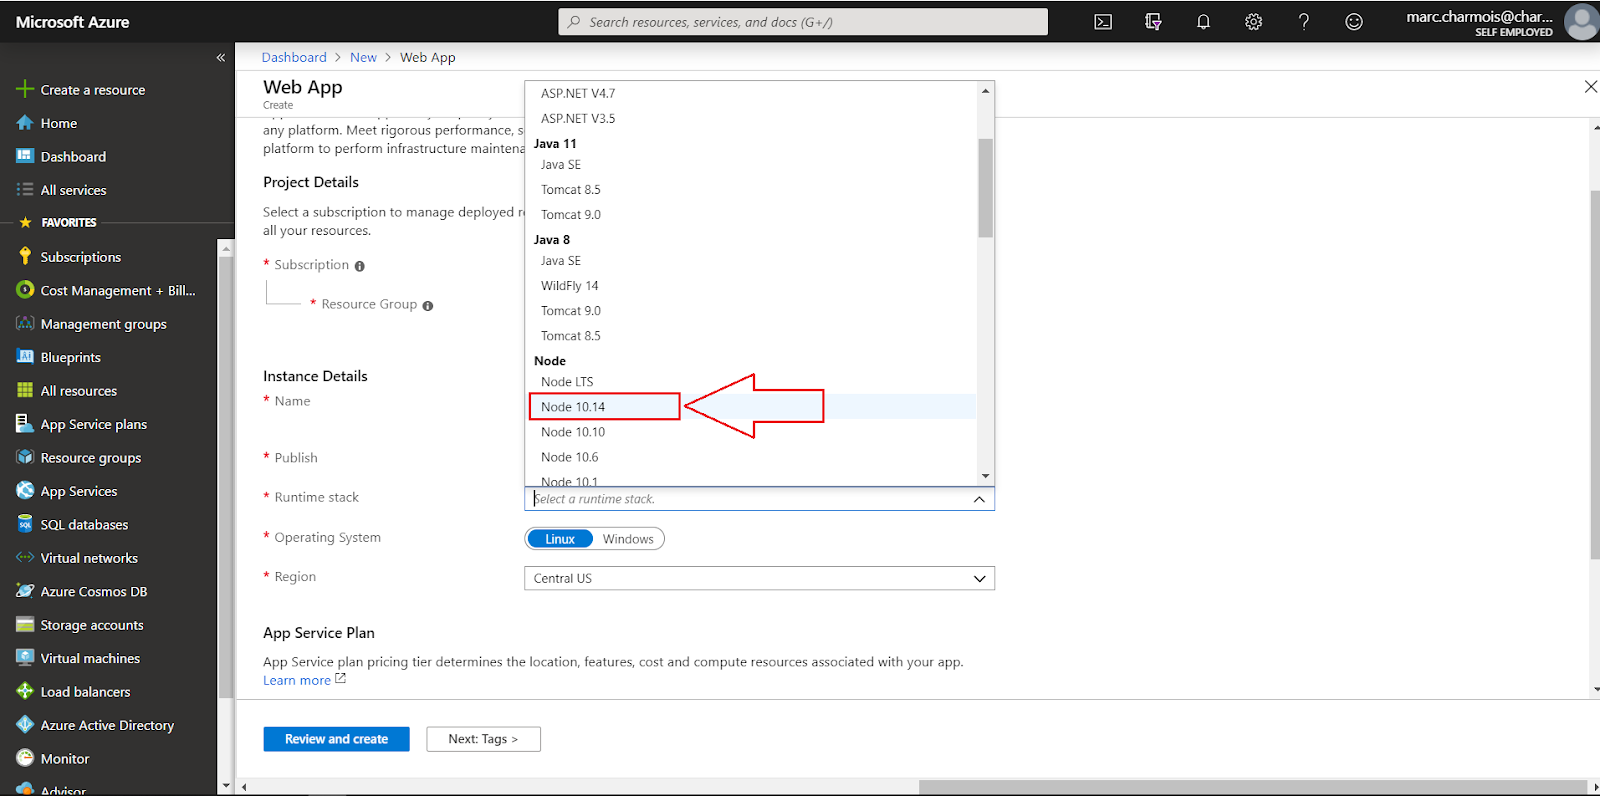
Now is the time to create the image, so open a command prompt and change directory to the one where is the API code and execute the following:

docker build -t nodeapp .


The image is mounted. We can see docker doing all the jobs described previously:


then we can run the image:

docker run -p 8888:80 nodeapp 


for testing the image locally, because we are using Docker Toolbox, we need the IP to request. It is in the Docker Toolbox command:


As we have set the port to 8888 we can test the running image locally:


Last we can execute a command to list the containers and see hte latest one

docker container ls


Pushing Container to Azure

Now is the time to connect to the Container Registry where to push our Container


this is the command to do it

docker login <your Container registry name>


You are helped by the Container Registry Quick Start:


If you need the credentials you can find them here:


Now, we have to define the container before pushing it:


docker tag nodeapp <your Container registry name>.azurecr.io/nodeapp


then we start the push

docker push <your Container registry name>.azurecr.io/nodeapp


And it's amazing we are really seeing the container being pushed to Azure piece by piece:


And finally it's done:


And we can see the push result in Azure Container registry:


Deploying the container to a Web App for Containers

Now if we want our container to run and display our API we can, for example, deploy it to an Azure Web App for Containers

For doing so, navigate to the container and open the latest push features by clicking on the dots and select "Deploy to web app":


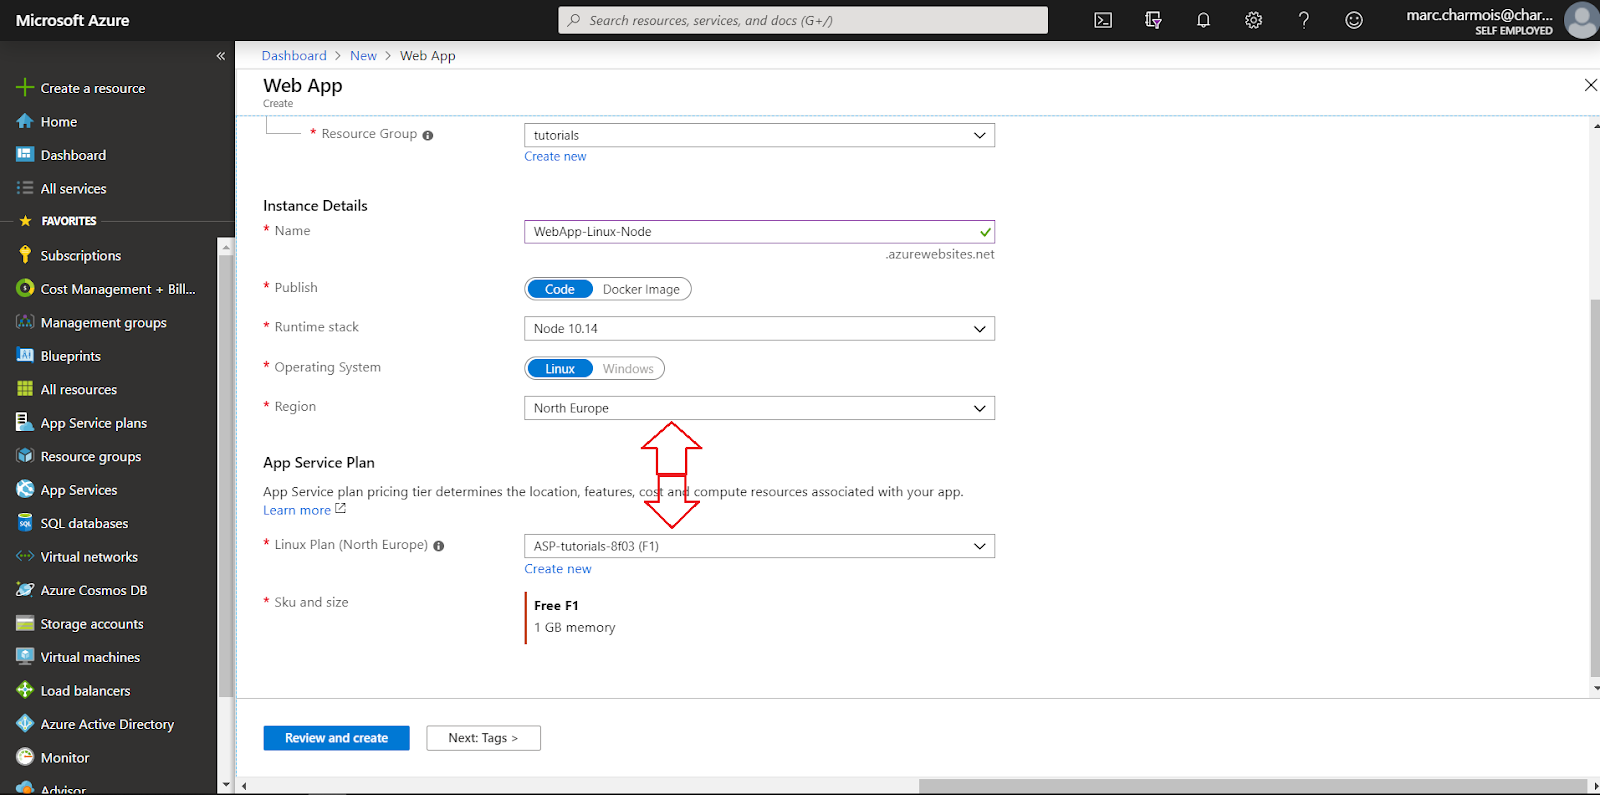
Name your container, chose subscription and resource group, select a service plan. I have one for Linux and had to locate it in North Europe because it is one of the region available for the Linux Web App for containers and we can have only one Free Plan for Linux Web App for Containers. So no choice for me.


After having clicked on the create button, we can check the deployment setps:


And finally it's deployed


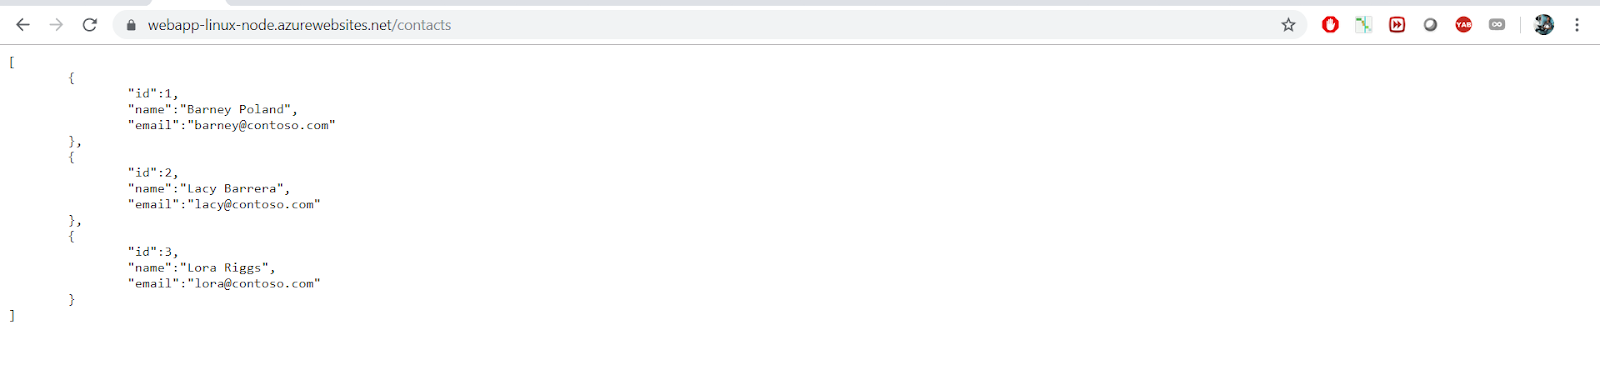
We can go to the Overview page of the Web App for Containers where our Linux Alpine container with the Node.js API is deployed:


And we can test it works properly by clicking on the Url:


Well done!

Thursday, September 12, 2019

Troubleshoot Docker registry login timeout issue for Docker Toolbox

topic

Solve error:
docker registry login net/http: request canceled while waiting for connection (Client.Timeout exceeded...
especially
docker azure registry login net/http: request canceled while waiting for connection (Client.Timeout exceeded..
when wanting to log to a Docker registry while using the Docker tool box.

Introduction

If you want to work with Docker using a Windows 10 OS, Home version, you won't be allowed by the installation program to install Docker desktop. Docker desktop needs Hyper V and although Hyper V is now available even on Windows 10 Home, the Docker desktop installation program still checks only the OS version. If it doesn't find a Pro or an Enterprise version on your computer, it stops installation.
Fortunately you can performs the main Docker tasks using Docker tool box.

Error reason

The "Client.Timeout exceeded" issue while attempting to login to a Docker registry is due to a bad network configuration of your Docker Toolbox. When installing Docker Toolbox a default Virtual Box VM is also installed to your computer with 2 networks adapters. It is located at: drive\user\.docker\machine\machines\default


you can open it with Oracle Virtual Box that is also installed with the Docker Toolbox. If you open Settings and Network you will see the 2 adapters.


Warning: If you play with the virtual box and close it, you will close also the connection to your running containers. It is like disable the network adapter that allows you to connect to the running containers and test them locally. If you have this issue, close the docker Toolbox and restart it. A new connection and IP address will be reallocated:


Troubleshouting the issue

For troubleshooting the timeout issue you have to configure the Virtual Box Network Adapters.

Open the settings of Windows 10
Go to Network & Internet settings:


then, Change adapter options


then double click on VirtualBox Host-Only Network
Properties
Select Internet Protocol Version 4
Open properties
Set the DNS to 8 8 8 8

It should fix the timeout issue.


do the same for VirtualBox Host-Only Network # 2

It seems that it has solved also connection troubles for the Docker Extension of Visual Studio Code.


Wednesday, September 11, 2019

Deploy a Flask Restplus API to an Azure Linux Web App

Topic:

Deploy a python Flask Restplus API to an Azure Linux Web App (code available in my github repo: app-service-Linux-API-Python )

Tutorial

I will publish soon :
  • the steps and screenshots to configure your local (windows) environment for Python
  • the deployment steps and screenshots
the Web App creation steps and screenshots are the same than those of the previous post
The deployment steps are quite the same excepted that you clone the code from the git repo and add a remote to the Azure Web App.

Deployment steps

roughly:
  • Create an Azure Linux Web App (App service on Linux)
  • Go to deployment center and chose : Git local, App Service build engine
  • clone the code of my repo: app-service-Linux-API-Python
  • Add the WebApp git url of the deployment center as a remote
  • Push the code to the Web App. When asked for credentials go to FTP/Credentials an copy Username and Password. The Username to use begins by the $, don't take the domain.


After deployment

this is the result after deployment:


It is online with anonymous access, you can play with it:

try the Flask Restplus features

Enjoy!

Monday, September 9, 2019

Build a Node.js application and deploy it (git push) to an Azure Linux Web App (Azure App Service on Linux)

Topic

This post shows how to create a Node.js Express application and deploy it to an Azure Linux Web App using a git push.

Prerequistes

You must have:

Creating the Azure Linux Web App via the portal

Sign-in to Azure Portal and click on "Create a resource" (1), then Web App (2).


Chose your Subscription, your Resource Group, your Azure Web App name, and let the other values unchanged because by default the Web App creation pane is configured for "Code" and "Linux".


Then, chose your stack. I took Node 10.14 but it seems it's better to take Node LTS (newer).


Then, chose your App Service Plan. You can have just one Free App Service Plan for Linux Azure Web App. As I have already, previously, created an Azure Web App for containers based on Linux and it is only available in North Europe (not yet in France), I had to based my free Linux sService Plan on North Europe. So for this new Linux Azure Web App I had no other choice than chosing North Europe as the region, in order to take benefits of the free App Service Plan for Linux.


Review and create page summarizes your choices before creating the Azure Web App. Then, click on Create.


You can then follow the steps of the Azure Web App creation.


Until it's complete.


Go then to the "Overview" page of your brand new Azure Linux Web App, And click on the Azure Web App Url to test it:


Exploring the Azure Linux Web App with SSH tool

Locate the SSH tool in the development tools section of your Web App menu and open it.


You, then, can use the "cd" command to navigate through the folders hierarchy and "ls" to list their content. ("dir" works also). You notice that in wwwroot folder, we only have the hostingstart.html page that displayed previously when testing the Azure Linux Web App.

Creating the Node.js Express Application

Open a command prompt, navigate to your development folder, and install Express Generator by typing:
npm install -g express-generator


Then, create locally your Node.js Express application by typing:
express WebApp-Linux-Node --view pug --git


As adviced by the creation program, change directory to go to the Node.js Express application code directory, install the dependencies:
cd WebApp-Linux-Node
npm install


Then, start the Node.js Express application locally by typing:
npm start

and opening this url in a browser:
http://localhost:3000


Deploying the Node.js Express application to an Azure Linux Web App

Setting the deployment mode

Locate the deployment center menu item of your Azure Linux Web App in the Azure Portal and oepn it.


Select "Local Git" then click on "Continue" button.


Select then, App Service build engine (Kudu) and click "Continue" button.


The App Service build engine of the Azure Kudu provides you with a git Url. You can:
  • clone it to add file locally to the repo and push them to your Azure Web App
  • or use it to add a remote to your existing git repo (it is that we are going to do)
Kudu behaves as a real git repo integrated to the Azure Web App. You will see more later after deployment.


click then on the "FTP Credentials" horizontal menu item to copy your credentials


Paste them to a txt file for later.


Deploying the Node.js application to the Azure Linux Web App

Go back to your command prompt and add a git file to your repo by typing:
git init .


then, add your files to the deployment scope:
git add .


commit this adding:
git commit -m "initial commit"


add the Azure Web App git url as a remote destination to your Git configuration:
git add remote add AzureWebApp <git url in the deployment center overview>


finally push your files to the Linux Azure Web App
git push --set-upstream AzureWebApp master


You are prompted for your crendentials. Use the ones pasted previously.


This is the deployment screen shot. You can notice that Kudu builds the code, executes commands like npm install...


Finally, if you go back to the Deployment Center of your Linux Azure Web App, you see the trace of the deployment just as if the Deployment Center was a git repo with the message of your last commit!


You can go to the overview page of your Linux Azure Web App to click the Url of the Web App.


And check that the Linux Azure Web App is serving your Node.js application successfully!


Using the SSH tool to check the deployment

You can now navigate with the SSH tool to check your Web App folders and see the files:


for example the www file in the bin folder. Notice that the 3000 port has not been changed and that the application is running anyway, the Web App take set the port using the process.env.PORT.


We can also open the oryx manifest that has been created during the deployment


and check the deployment logs:
home > logFiles > Kudu > deployment


Performing development on the Express API

Assume we want now to display a contact list from our API. You can find the complete source code of this sample in my github repo: app-service-linux-api-node-sample.

1. Adding routes to app.js

Open app.js in a code editor and define a new route for your contactlist:
var indexRouter = require('./routes/index');
var usersRouter = require('./routes/users');
var contactsRouter = require('./routes/contacts');//adding a router for contacts


var app = express();


// view engine setup
app.set('views'path.join(__dirname'views'));
app.set('view engine''pug');


app.use(logger('dev'));
app.use(express.json());
app.use(express.urlencoded({ extended: false }));
app.use(cookieParser());
app.use(express.static(path.join(__dirname'public')));


app.use('/'indexRouter);
app.use('/users'usersRouter);
app.use('/contacts'contactsRouter);//adding a route for contacts

2. Adding the data

Create a folder at the root of your API and name it data. Create a json file named contacts.json in this folder.


This is the json to paste in the file:

[
    {
        "id":1,
        "name":"Barney Poland",
        "email":"barney@contoso.com"
    },
    {
        "id":2,
        "name":"Lacy Barrera",
        "email":"lacy@contoso.com"
    },
    {
        "id":3,
        "name":"Lora Riggs",
        "email":"lora@contoso.com"
    }
]

3. Create the route

Create a contacts.js file in the "routes" folder:


This is the js code to paste in:


var express = require('express');
var router = express.Router();

router.get('/'function(reqresnext) {
  res.sendFile("/data/contacts.json",{ root: "./" });
}) 

module.exports = router;

4. Testing locally

you can then test your new code locally by executing a npm start:


and browsing to :
http://localhost:3000/contacts


4. Deployment to the Azure Linux Web App

You can then push your code to the Azure Linux Web App


I had to restart the Web App after deployment to see the new feature of the Linux Web App Node.js API working:


You can see the trace of your new deployment in the deployment center of your Azure Web App


keep developping with Azure App Service Extension for Visual Studio Code

Regarding Windows Azure Web App we have good online tools to develop online. Regarding Linux, don't hesitate to use this super cool feature of VS code to connect to your tenant and keep developping from your desktop:


references

This post is based on this Microsoft documentation.

Source code available in my github repo: app-service-linux-api-node-sample.