
Introduction
In the 2 previous posts, I showed how to deploy a simple (just 2 GET actions) REST API based on Node.js, Express and Swaggerize-express:
Now's time to show how to generate that code, and I use the word "generate" on purpose because we are going to see that the magic of swaggerize-express is to build a complete Node.js REST API in a few seconds based on the providing of a json template that describes the API. But most of all, this method to create an API allows you later, to be able to play with the API within Swagger UI.
So let's do this now an end to end project:
starting the development of an API from scratch and finally deploying it into Azure so that it be available for anybody!
I navigated to my code repository and created a new folder for the project, then I installed swaggerize-express locally.
npm install -g yo
npm install -g generator-swaggerize


As I had already swaggerize-express installed, it just updated my installed package.
Create a subfolder in your project folder. It is important to name it "config"
Open the main project folder with Visual Studio Code
Create an api.json empty file in the "config" sub-folder within Visual Studio Code


Paste the template json code in it and save it

We can now generate the REST API.
Go back to your command prompt and type:
yo swaggerize
Follow the prompts (note: make sure to choose express as your framework choice).
When asked for a swagger document, give the complete path of your api.json file. In my case
C:\dev\vscode-repo\swaggerize-express-rest-api\config\api.json
Then the magic is starting and Swaggerize-express creates a complete REST API project.

node server.js

and hitting the API within Chrome to have the json display in the browser, as defined in the server.js file:
http://localhost:8000/contacts

A mocked data generator is integrated with swaggerize-express that allows to test the API right after its creation.
Next step we are going to adapt this first project into an API with real data, and modify it to make it work within an Azure App Service.
All the calls go first to sever.js, so let's open it. We see this code:
So let's open this file too. We see that at this location that the mock data is generated by the swaggerize mock data generator and it is said that is the place to connect with our real datas.
We are going to go up from the data source toward the handlers and to develop the capability of our REST API to send our data.


Open a command prompt, navigate to your project folder and launch the server by typing:
node server.js
(for newbies, to stop the server on Windows type "ctrl c" like if you want to copy something)
At this step, as the js code is compiled by node.js before launching the server, if you had made a big coding error, the server wouldn't have started and you would have been provided within the command prompt with a error message with all the stack.
Then, hit localhost:8000/contacts on any browser but Internet Explorer (that serves the json as a file so not very useful for testing)
Hurrah! We can see our real data sent back from the REST API for the first time!

We didn't break the feature for requesting a single contact by its id. It's still working with auto-generated swaggerize mock data.

Now we have to connect the GET contacts/id action to our real data.
a refence to the npm module jsonpath that will serve us to retrieve a contact based on its id. a function with the id in parameter to retrieve the contact.
here is the updated complete code:


So type: npm install jsonpath in your command prompt.

Then we can test and get the expected result

At this step the project should look like this on your machine:
Well done! the last thing to do is to deploy all this in Azure and the job is done.
But before opening an one hour trial for the Azure App Services we have to prepare our project for the deployment.
The App Service we are targetting for deploying is an empty Web App.
Unfortunately, our server.js file generated automatically by Swaggerize-express isn't totally compliant with this Azure empty Web App we are targetting for deploying. We thus have to update our server.js file.
So open it in your editor and replace its code with the following:

If we want to test locally a last time before deploying we have first to install swaggerize-ui npm module. It is also important for Azure because this local installation will be tracked in our local project and tell Azure that the module is needed within the Azure environment.

You notice that there is only 2 types of Web App available. Previously, until mid 2018, we had API App and Serverles Apps (Logic App and Function). But there was dramatic changes in App Servics from mid 2018. You can consult my other post if you want to know more on this topic. You are then invited to choose the type of App Service you want to try. There is not a lot of choice. As we don't use containers we have to select the Web App. You will see that you can totally use a Web App for hosting a Node.js REST API. From summer 2018, the only resource running an application (Web site, API, Mobile Backend) in Azure App Services, is the Web App . Thus, select the Web App, then click Next.

Now is the time to chose the template. Before 2018 we had a template Node.js + Express but is has been removed. The others were left. Anyway, you will see that an Azure App Services "Empty Site" is "smart enough" to "understand" that we are going to deploy a Node.js RESTful API on it and make it work. Thus chose the empty Web App and click on "Create". As wrritten previously you can use one of the 4 social networks account to sign in : Microsoft (live), Google +, Facebook, Github. For the demonstration I will use my Live account.


Then, Azure is provisionning your App Service in a few seconds.

And an ONE Hour countdown is starting lettting you play with the Azure App Service and the Azure Portal within this hour.

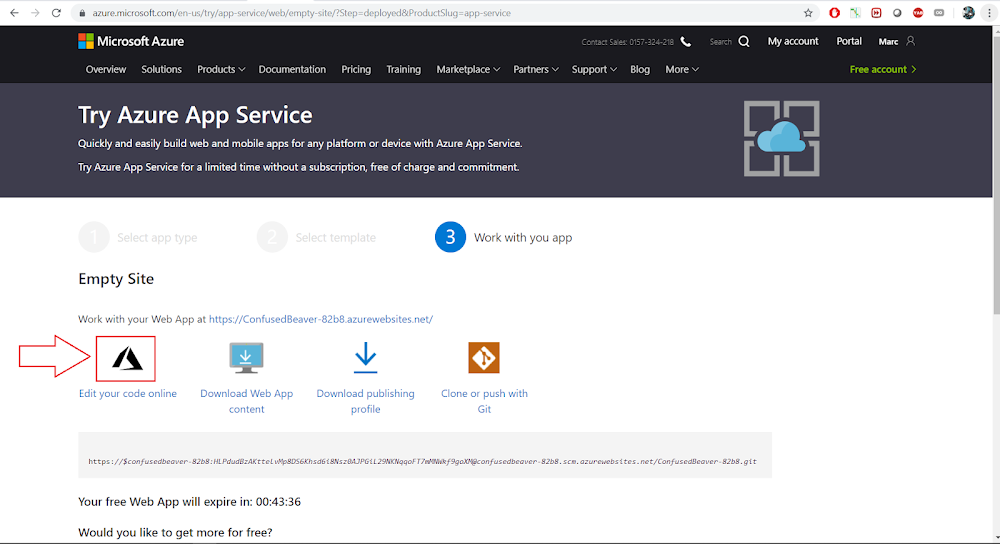
Before mid 2018, we were able to go to the Azure Portal from this UI and see the porperties of the Web App but it's over now. We were also able to change the API file code online using the App Service Editor (Visual Studio Code online), but it has been replaced by Kudu. But you can navigate throguh the Web App folders and modify them using Kudu. You can also deploy an API by uploading files to Kudu. I have another post that shows how to do it.
The best way to create a .gitignore file is to create it within Visual Studion Code. Add a file named .gitignore at the root of your code repo:

then paste the following lines to avoid pushing the node modules and the readme file to the Azure Web App folders when deploying:


type
git init .
to initialize the git feature for the deployment
Check with
git status
that the files under node_modules would be excluded (the next screenshots are from a command prompt, good way to avoid problems of credentials cache in VS code)

then type
git add .
to add all the files references to the future deployment
All the files of node_modules should not be taken into account thanks to the .gitignore file.
Now commit all the changes to prepared them to be pushed in Azure. All is new so type:
git commit -m "initial commit"
When the commit is finished, it's time to deploy, so we are going to add the reference to our Azure App Service
Go back to the "Try Azure App Service" welcome page were the countdown is running and pick the git url by clicking on the "clone or push with git" button. Copy the url in your clipboard.

Then type
git remote add AzureWebApp
and right click the Integrated Terminal to paste the Azure App Service git url

then for deploying, type:
git push AzureWebApp
The git command will correct you and you will be able to execute the right command.
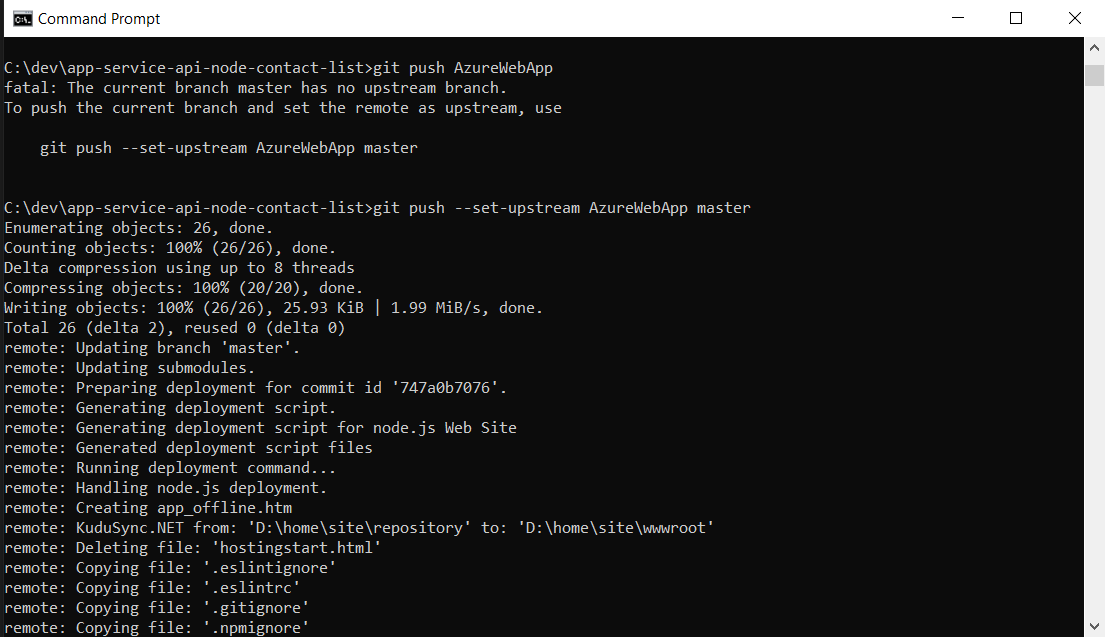
Deployment is starting. Kudu, the Azure App Service build engine, warns you that it is updating the master branch of the Web App. The Azure Web App is a real git repo.
Then Kudu understands that a Node.js application is intended to be deployed
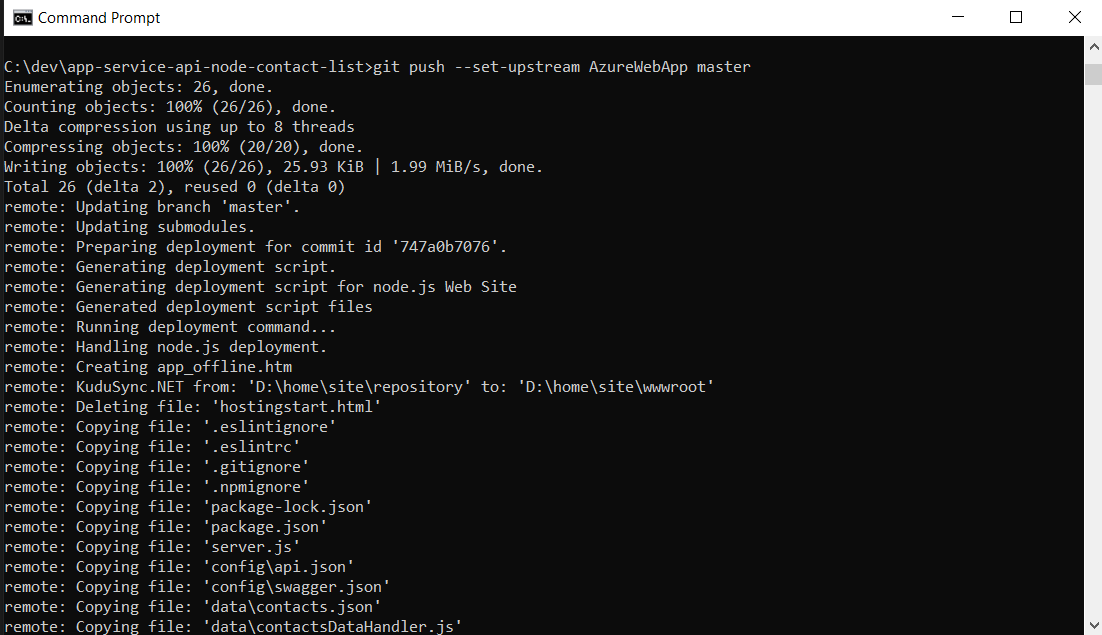
Then the files begin to be copied to the Web App folder: wwwroot.
then Kudu:
Then Kudu performs an NPM install to get all the Node.js packages required for the API:
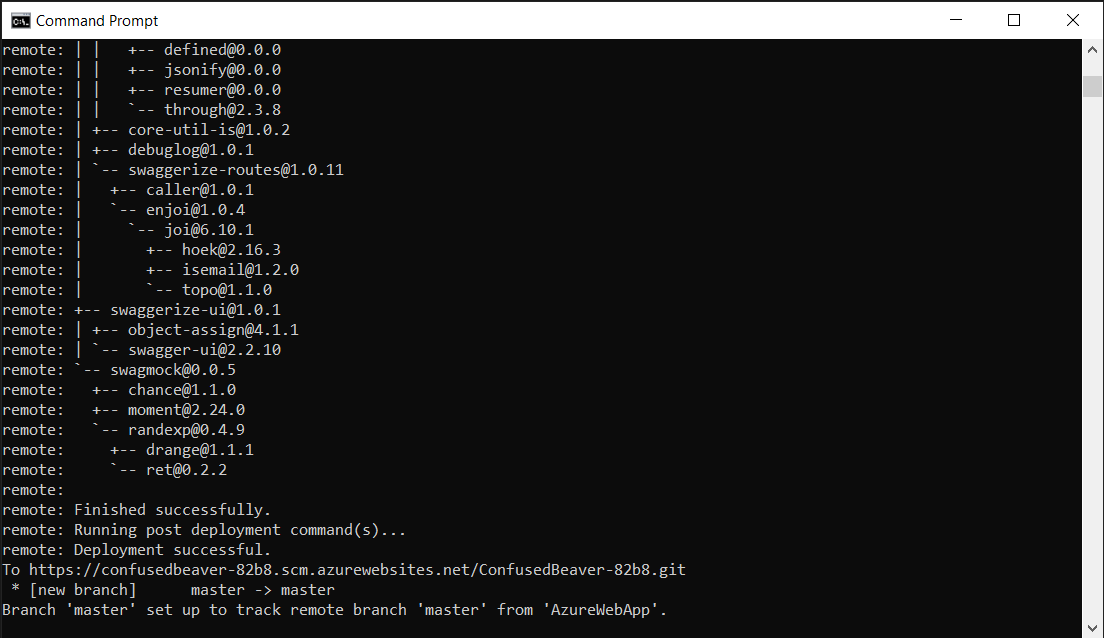
The deployment is successful.
We can check the deployment by visiting Kudu:
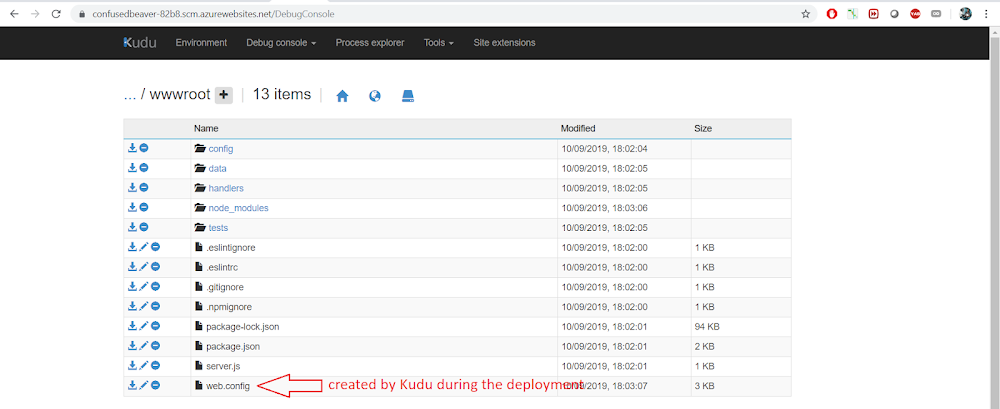
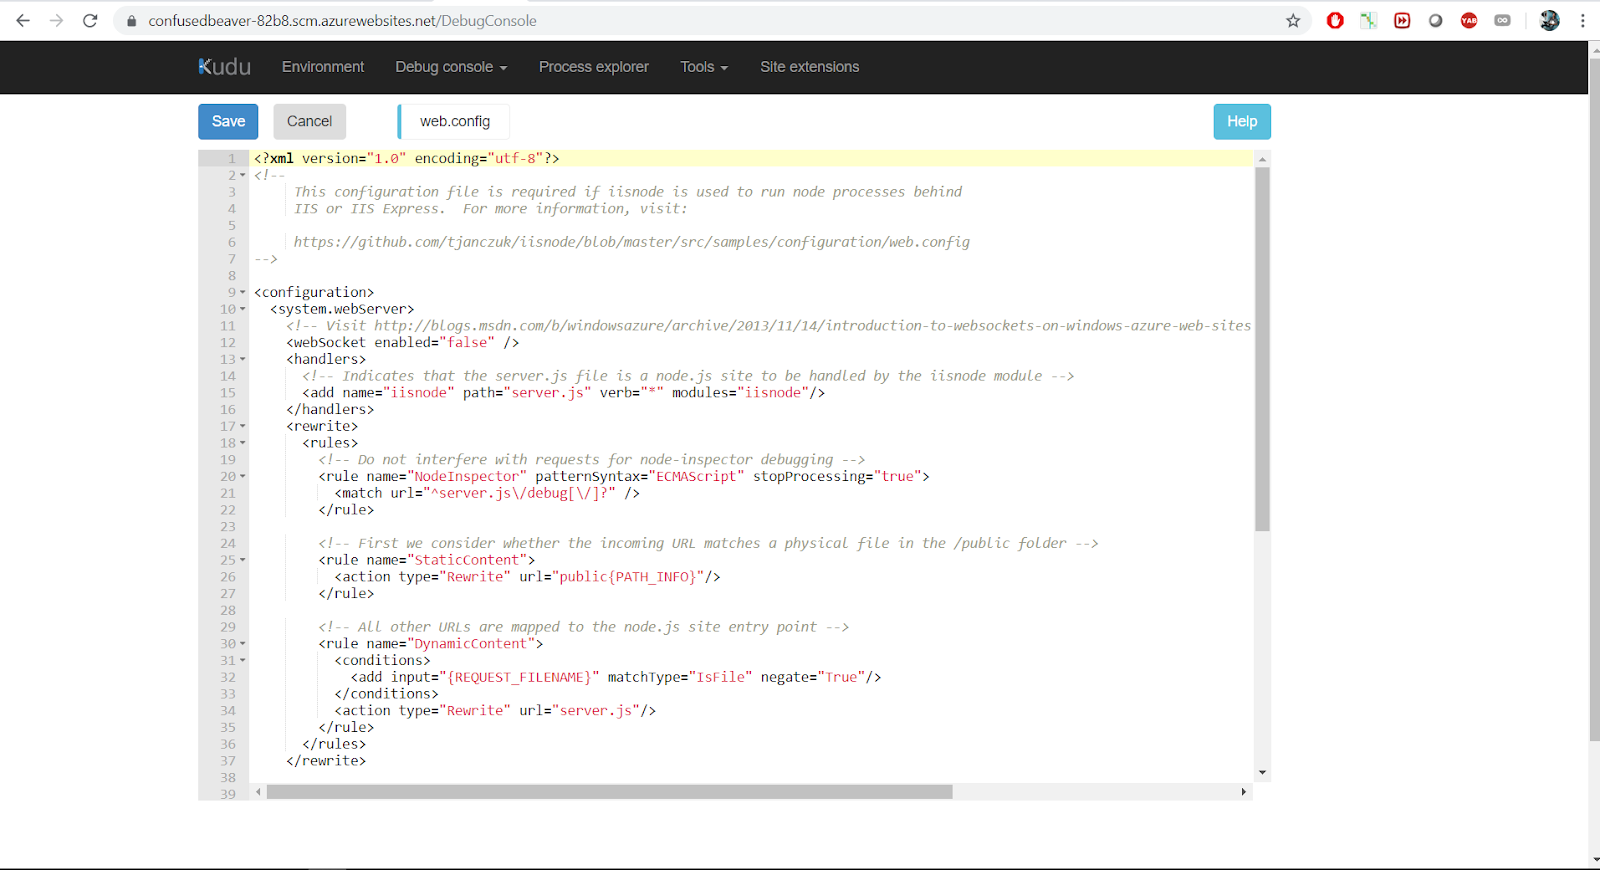
You can see the files of the API and the web.config file created by Kudu during the deployment.
and you can even edit this file and other online.

You will get an error on the root site because we didn't implement the GET / site route, but if you complete the root site url with /contacts you will have the pleasure to notice that everyhting is ok.

The correct syntax for the Url to display our API in Swagger UI is
yourAzureAppUrl/docs
Enjoy folks!
- Very quicly by using the "Try Azure App Service" feature that let you play for free one hour with an Azure App Service
- More professionnaly by using an Azure "free" account, one month available, but that requires you to give a credit card information to Microsoft.
Now's time to show how to generate that code, and I use the word "generate" on purpose because we are going to see that the magic of swaggerize-express is to build a complete Node.js REST API in a few seconds based on the providing of a json template that describes the API. But most of all, this method to create an API allows you later, to be able to play with the API within Swagger UI.
So let's do this now an end to end project:
starting the development of an API from scratch and finally deploying it into Azure so that it be available for anybody!
Prerequisites
- Node.js
- Git
- Visual Studio Code
Building the REST API
Installing Swaggerize-express
As described in the Swaggerize-express documentation, first, open a command prompt.I navigated to my code repository and created a new folder for the project, then I installed swaggerize-express locally.
npm install -g yo
npm install -g generator-swaggerize
As I had already swaggerize-express installed, it just updated my installed package.
Generating the REST API
Now we are going to generate a complete node.js REST API (although there is just 2 actions using GET verb) based on this descriptive json template. So copy next code (it is not a picture :-)):
{
"swagger": "2.0",
"info": {
"version": "v1",
"title": "Contact List",
"description": "A Contact list API based on Swagger and built
using Node.js"
},
"paths":{
"/contacts":{
"get": {
"tags": ["Contacts"],
"operationId": "contacts_get",
"consumes":[],
"produces":["application/json",
"text/json"],
"responses":{
"200":{
"description":"OK",
"schema":{
"type": "array",
"items": {
"$ref": "#/definitions/Contact"
}
}
}
},
"deprecated": false
}
},
"/contacts/{id}": {
"get": {
"tags": ["Contacts"],
"operationId": "contacts_getById",
"consumes":[],
"produces":["application/json",
"text/json"],
"parameters":[{
"name":"id",
"in": "path",
"required": true,
"type": "integer",
"format": "int32"
}],
"responses": {
"200": {
"description": "OK",
"schema": {
"type": "array",
"items": {
"$ref": "#/definitions/Contact"
}
}
}
},
"deprecated": false
}
}
},
"definitions": {
"Contact": {
"type": "object",
"properties": {
"id": {
"format": "int32",
"type": "integer"
},
"name": {
"type": "string"
},
"email": {
"type": "string"
}
}
}
}
}
Create a subfolder in your project folder. It is important to name it "config"
Open the main project folder with Visual Studio Code
Create an api.json empty file in the "config" sub-folder within Visual Studio Code
Paste the template json code in it and save it
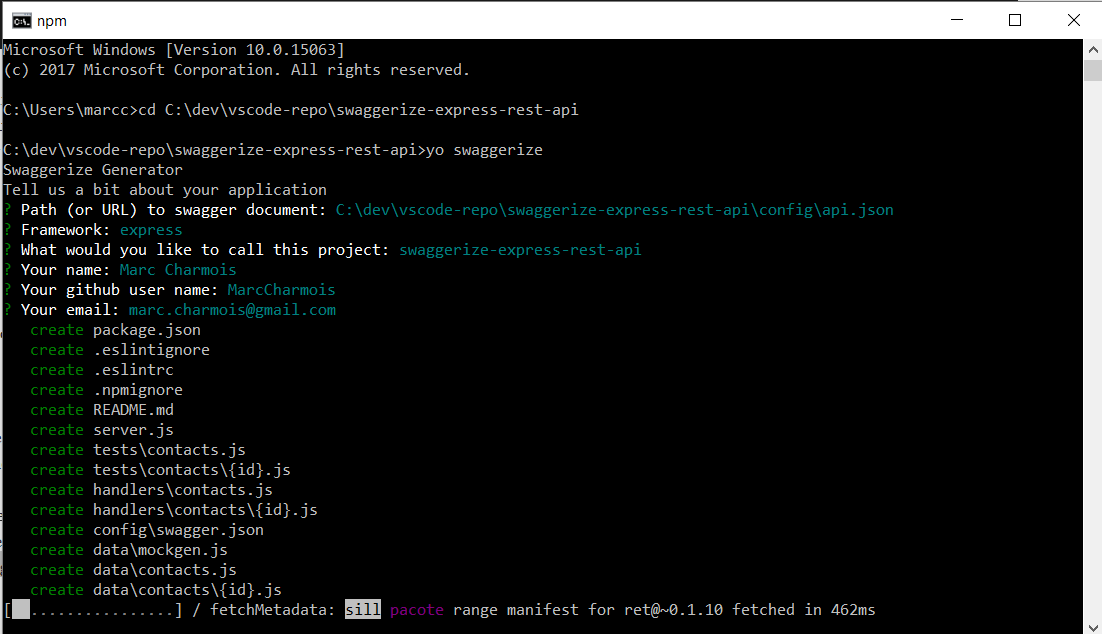
We can now generate the REST API.
Go back to your command prompt and type:
yo swaggerize
Follow the prompts (note: make sure to choose express as your framework choice).
When asked for a swagger document, give the complete path of your api.json file. In my case
C:\dev\vscode-repo\swaggerize-express-rest-api\config\api.json
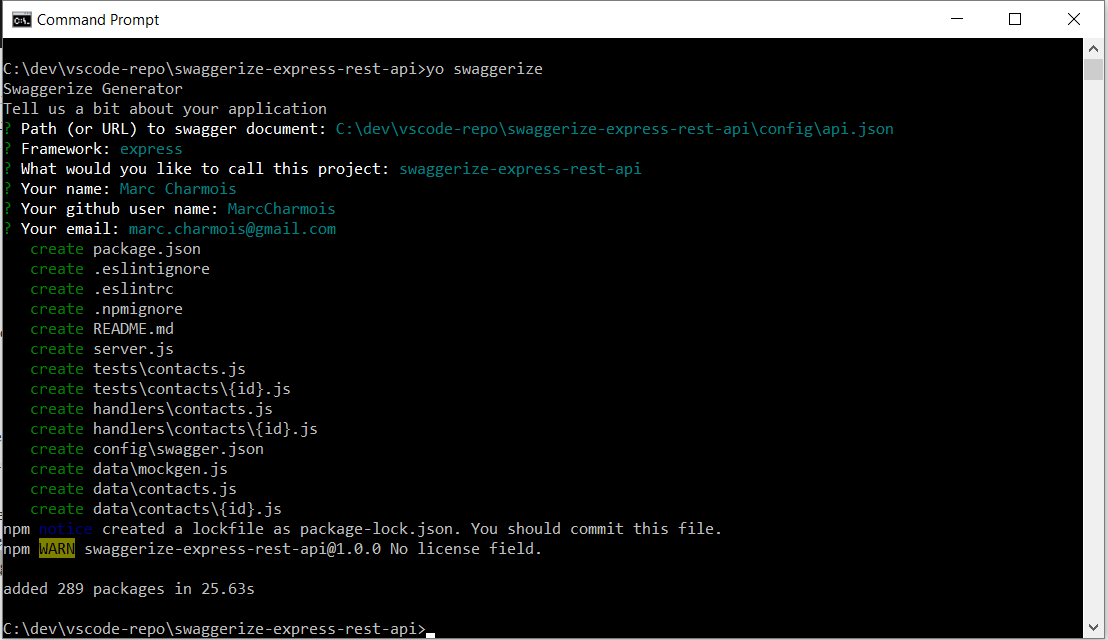
Then the magic is starting and Swaggerize-express creates a complete REST API project.
Testing the first version of our REST API generated with Swaggerize-express
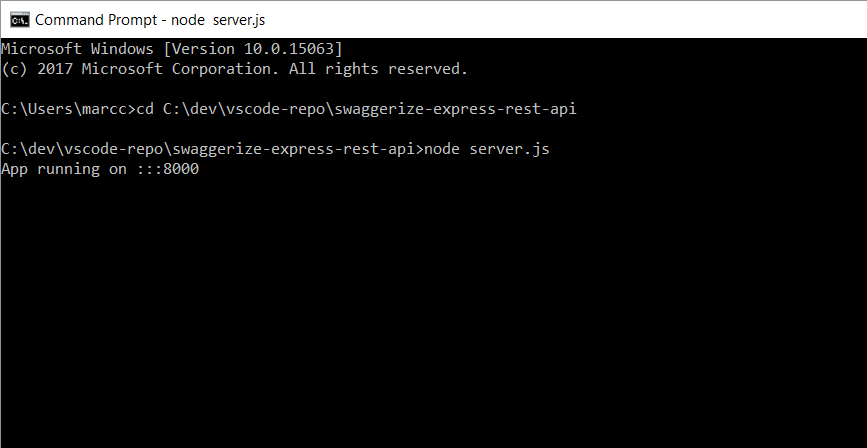
and we can test it right now by typing:node server.js
and hitting the API within Chrome to have the json display in the browser, as defined in the server.js file:
http://localhost:8000/contacts
A mocked data generator is integrated with swaggerize-express that allows to test the API right after its creation.
Next step we are going to adapt this first project into an API with real data, and modify it to make it work within an Azure App Service.
Placing real (mock) data in the API
Understanding the code
Let's try to understand how the API works.All the calls go first to sever.js, so let's open it. We see this code:
App.use(Swaggerize({
    api: Path.resolve('./config/swagger.json'),
    handlers: Path.resolve('./handlers')
}));
So the calls to the API are driven by the handlers.
- If we hit the API url/contacts, the handlers\contacts.js file is processing the call.
- If we hit the API url/contacts/anId, the handlers\contacts\{id}.js file is processing the call.
So let's open this file too. We see that at this location that the mock data is generated by the swaggerize mock data generator and it is said that is the place to connect with our real datas.
We are going to go up from the data source toward the handlers and to develop the capability of our REST API to send our data.
Adding the contacts.json file hosting our mock data
Let's create a contacts.json file under the data folder and place this json data in it:
[
 {
  "id":1,
  "name":"Barney Poland",
  "email":"barney@contoso.com"
 },
 {
  "id":2,
  "name":"Lacy Barrera",
  "email":"lacy@contoso.com"
 },
 {
  "id":3,
  "name":"Lora Riggs",
  "email":"lora@contoso.com"
 }
]
Adding the contactsDataHandler.js file for serving our mock data
Rename the \data\contacts.js file to contactsDataHandler.js and add this code in it:
'use strict';

var contacts = require('./contacts.json');

module.exports = {
    all: function () {
        return contacts;
    }
};
Updating the code in handler\contacts.js file for serving our mock full data
Then, replace the code of the handlers\contacts.js file (a kind of controller) by this one:
'use strict';

 var contactsDataHandler = require('../data/contactsDataHandler');

 module.exports = {
     get: function contacts_get(req, res) {
         res.json(contactsDataHandler.all())
     }
 };
Open a command prompt, navigate to your project folder and launch the server by typing:
node server.js
(for newbies, to stop the server on Windows type "ctrl c" like if you want to copy something)
At this step, as the js code is compiled by node.js before launching the server, if you had made a big coding error, the server wouldn't have started and you would have been provided within the command prompt with a error message with all the stack.
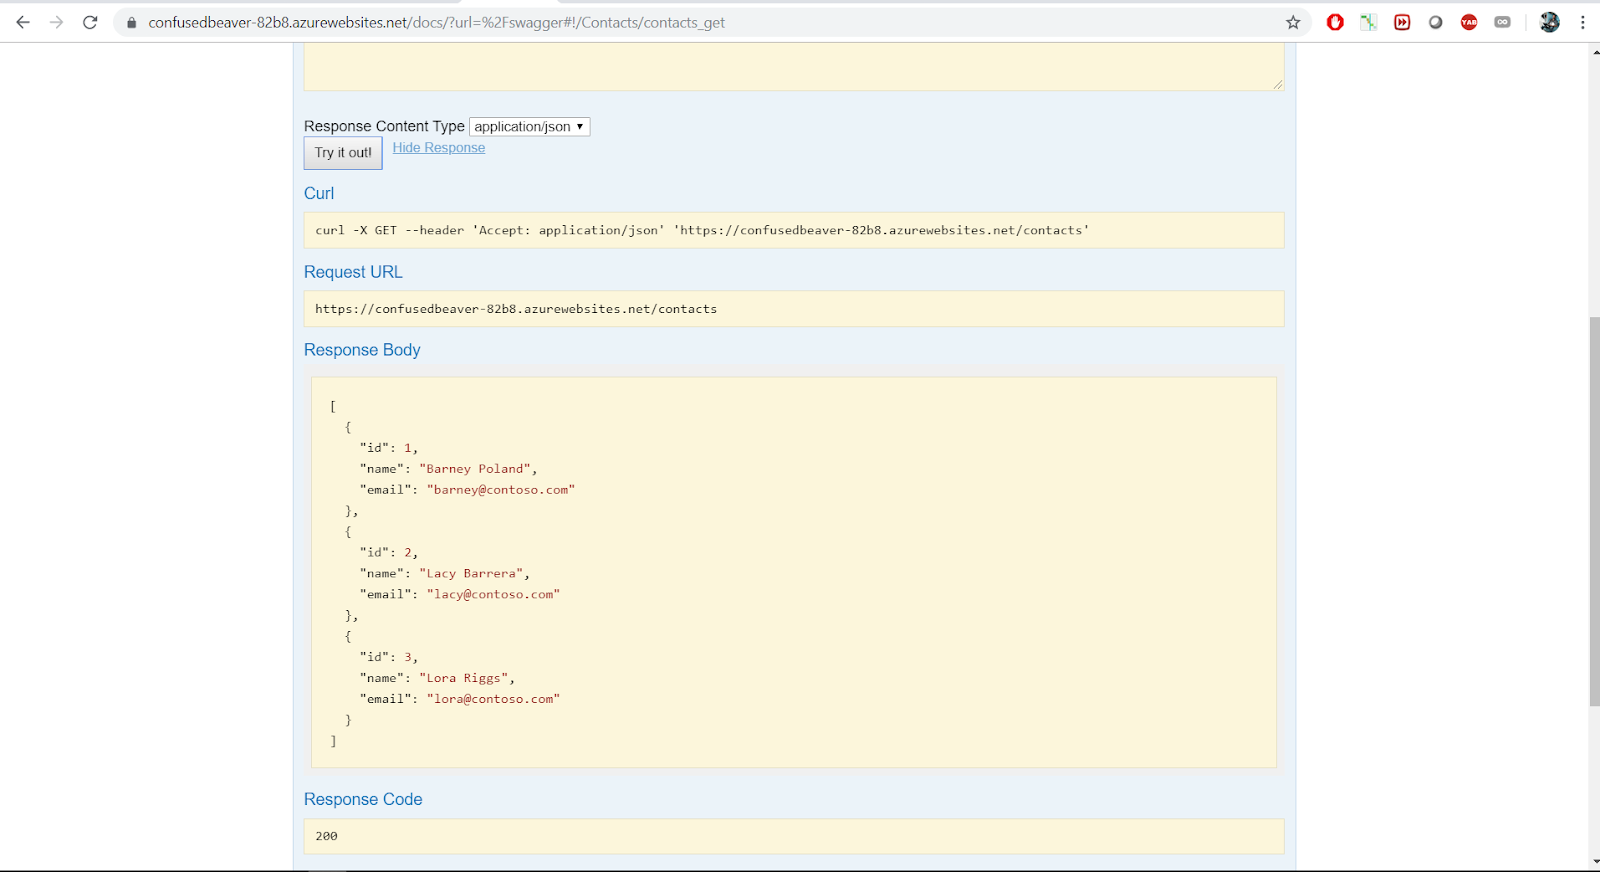
Then, hit localhost:8000/contacts on any browser but Internet Explorer (that serves the json as a file so not very useful for testing)
Hurrah! We can see our real data sent back from the REST API for the first time!
We didn't break the feature for requesting a single contact by its id. It's still working with auto-generated swaggerize mock data.
Now we have to connect the GET contacts/id action to our real data.
Updating the code of contactsDataHandler.js
open contactsDataHandler.js in Visual Studio code and add:a refence to the npm module jsonpath that will serve us to retrieve a contact based on its id. a function with the id in parameter to retrieve the contact.
here is the updated complete code:
'use strict';

var contacts = require('./contacts.json');
var jp = require('jsonpath')

module.exports = {
    get: function (id) {
        return jp.query(contacts, '$..[?(@.id=='+id+')]');
    },
    all: function () {
        return contacts;
    }
};
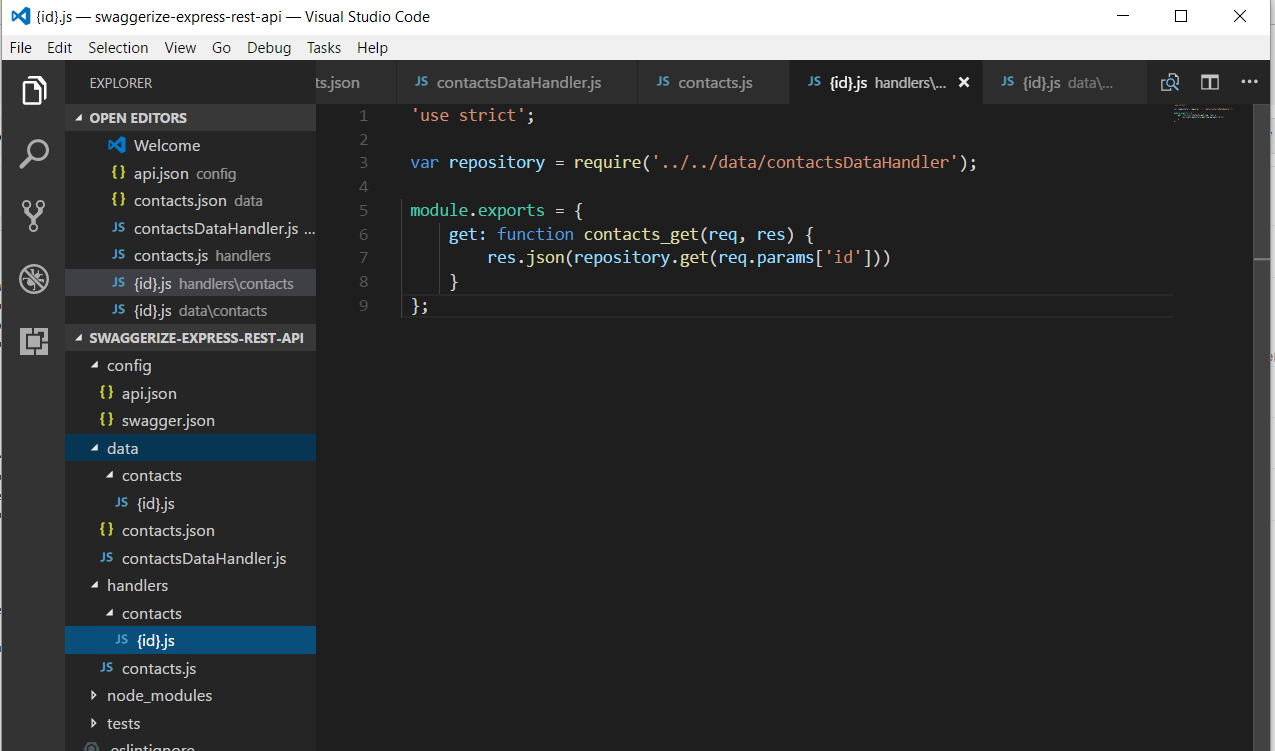
Updating the code of contacts\{id}.js
open contacts\{id}.js file in Visual Studio code and replace the code in it by this one:
 'use strict';

 var repository = require('../../data/contactsDataHandler');

 module.exports = {
     get: function contacts_get(req, res) {
         res.json(repository.get(req.params['id']))
     }
 };
testing the action GET/contacts/id
We can test the developed code now but before to do that we have to install the npm jsonpath module we declared and used in the contacts dataHandler.So type: npm install jsonpath in your command prompt.
Then we can test and get the expected result
Deleting mockgen.js
we can now delete the mockgen.js file because we don't need it anymore since all is pointing on our real data stored in our contacts.json file.At this step the project should look like this on your machine:
Well done! the last thing to do is to deploy all this in Azure and the job is done.
Deploying the Swaggerize REST API into an Azure App Service
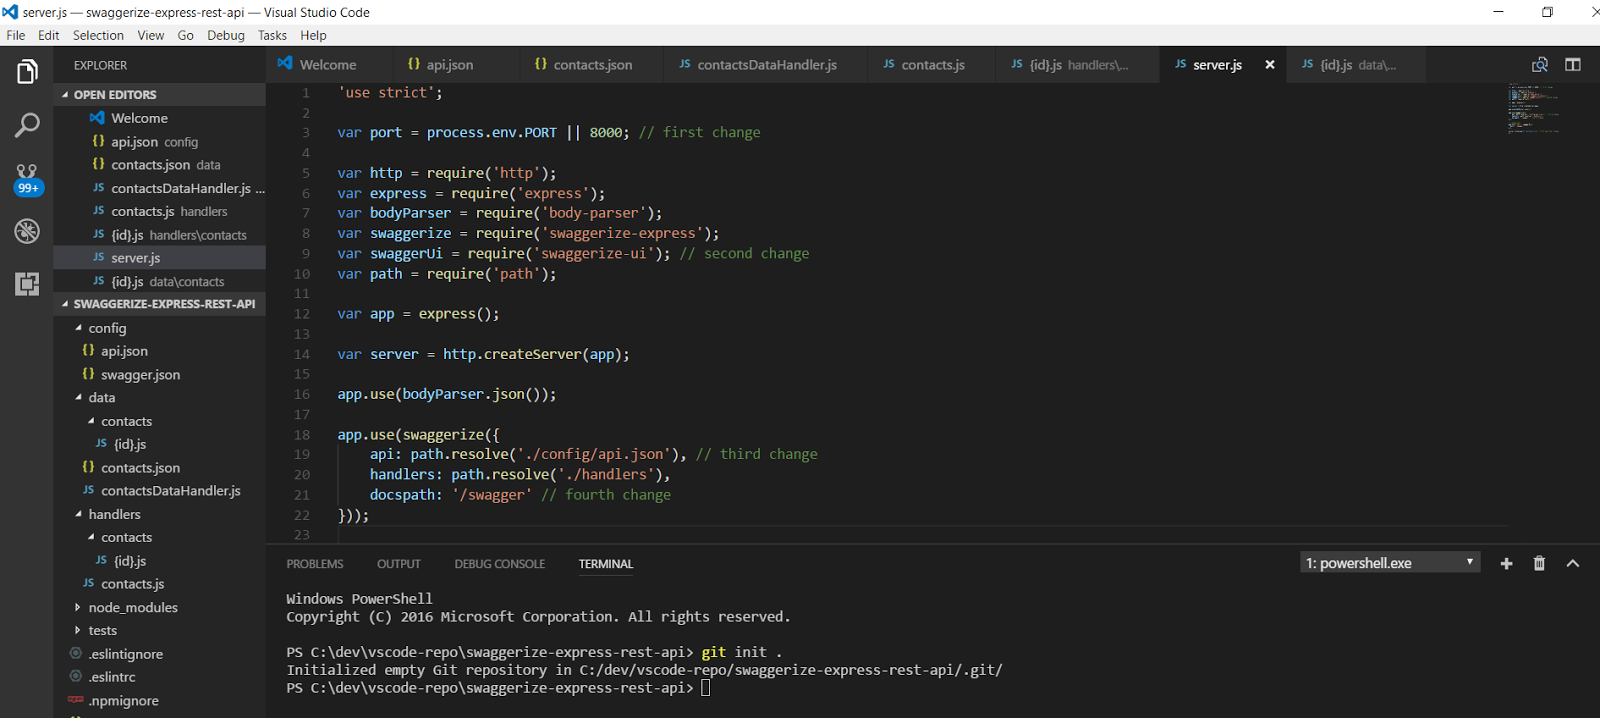
Last update before deploying, server.js file
We are going to use for this deployment the "Try Azure App Service" feature that offers to take benefit of the Azure portal very quickly for one hour. You just have to have one of this social account (Microsoft, Google, Facebook, Github).But before opening an one hour trial for the Azure App Services we have to prepare our project for the deployment.
The App Service we are targetting for deploying is an empty Web App.
Unfortunately, our server.js file generated automatically by Swaggerize-express isn't totally compliant with this Azure empty Web App we are targetting for deploying. We thus have to update our server.js file.
So open it in your editor and replace its code with the following:
'use strict';

var port = process.env.PORT || 8000; // first change

var http = require('http');
var express = require('express');
var bodyParser = require('body-parser');
var swaggerize = require('swaggerize-express');
var swaggerUi = require('swaggerize-ui'); // second change
var path = require('path');

var app = express();

var server = http.createServer(app);

app.use(bodyParser.json());

app.use(swaggerize({
    api: path.resolve('./config/api.json'), // third change
    handlers: path.resolve('./handlers'),
    docspath: '/swagger' // fourth change
}));

// change four
app.use('/docs', swaggerUi({
  docs: '/swagger'
}));

server.listen(port, function () { // fifth and final change
});
If we want to test locally a last time before deploying we have first to install swaggerize-ui npm module. It is also important for Azure because this local installation will be tracked in our local project and tell Azure that the module is needed within the Azure environment.
Creating the "Try Azure App Service" Azure App Service to host the project
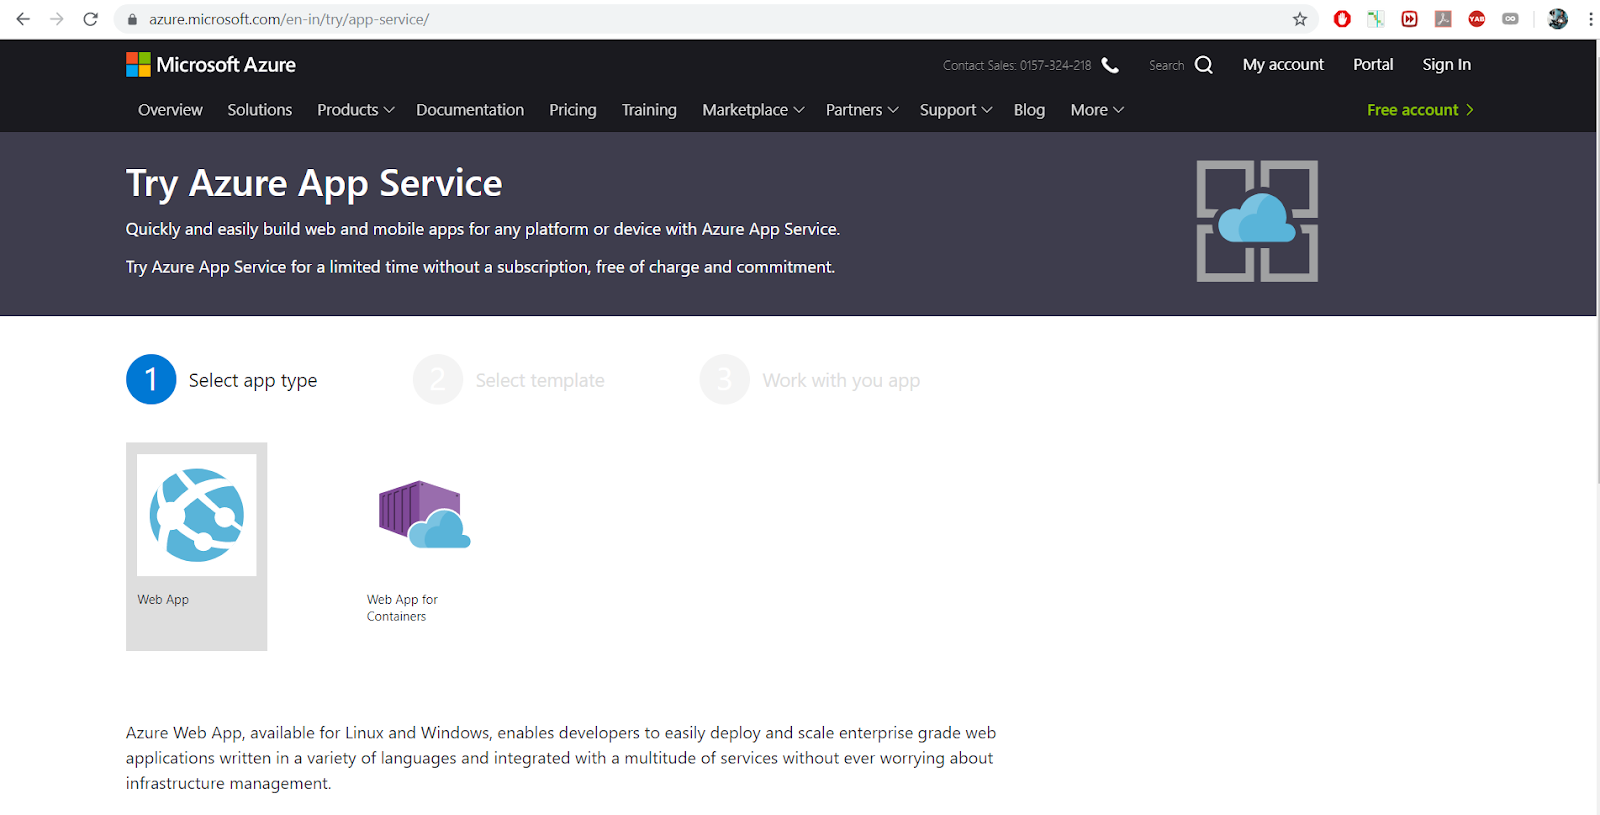
So let's deploy our Node.js REST API into this type of Azure App Service, totally free and without any commitment For enjoying this Azure feature, reach the welcome page of "Try Azure App Service"
You notice that there is only 2 types of Web App available. Previously, until mid 2018, we had API App and Serverles Apps (Logic App and Function). But there was dramatic changes in App Servics from mid 2018. You can consult my other post if you want to know more on this topic. You are then invited to choose the type of App Service you want to try. There is not a lot of choice. As we don't use containers we have to select the Web App. You will see that you can totally use a Web App for hosting a Node.js REST API. From summer 2018, the only resource running an application (Web site, API, Mobile Backend) in Azure App Services, is the Web App . Thus, select the Web App, then click Next.

Now is the time to chose the template. Before 2018 we had a template Node.js + Express but is has been removed. The others were left. Anyway, you will see that an Azure App Services "Empty Site" is "smart enough" to "understand" that we are going to deploy a Node.js RESTful API on it and make it work. Thus chose the empty Web App and click on "Create". As wrritten previously you can use one of the 4 social networks account to sign in : Microsoft (live), Google +, Facebook, Github. For the demonstration I will use my Live account.
Then, Azure is provisionning your App Service in a few seconds.

And an ONE Hour countdown is starting lettting you play with the Azure App Service and the Azure Portal within this hour.
Before mid 2018, we were able to go to the Azure Portal from this UI and see the porperties of the Web App but it's over now. We were also able to change the API file code online using the App Service Editor (Visual Studio Code online), but it has been replaced by Kudu. But you can navigate throguh the Web App folders and modify them using Kudu. You can also deploy an API by uploading files to Kudu. I have another post that shows how to do it.
Creating a .gitignore file
We have to prepare the deployment with another step. We have to exclude the thousand files of the npm modules installed locally in our project to prevent them to be deployed in Azure. Azure has them anyway or can get them at the deployment time much more faster than to deploy them from our local machine.The best way to create a .gitignore file is to create it within Visual Studion Code. Add a file named .gitignore at the root of your code repo:
then paste the following lines to avoid pushing the node modules and the readme file to the Azure Web App folders when deploying:
/node_modules
*.md

trick to use if you have not Visual Studio Code and you want to create the .gitignore file (that has no name and only an extension):
Create a gitignore.txt file at the root of your project and paste (my screenshot is wrong I forgot the "s" to "moduleS"):
node_modules/
in it

Then if you are on Windows OS, press the right-shift key of your keyboard and right-click a blank space inside your folder (not a file) and select "open a powershell window from here" in the contextual menu.

In the powershell prompt type:
ren gitignore.txt .gitignore.

node_modules/
in it
Then if you are on Windows OS, press the right-shift key of your keyboard and right-click a blank space inside your folder (not a file) and select "open a powershell window from here" in the contextual menu.
In the powershell prompt type:
ren gitignore.txt .gitignore.
Deploying the Swaggerize-express API into Azure
Open the Integrated Terminal of visual studio code.
type
git init .
to initialize the git feature for the deployment
Check with
git status
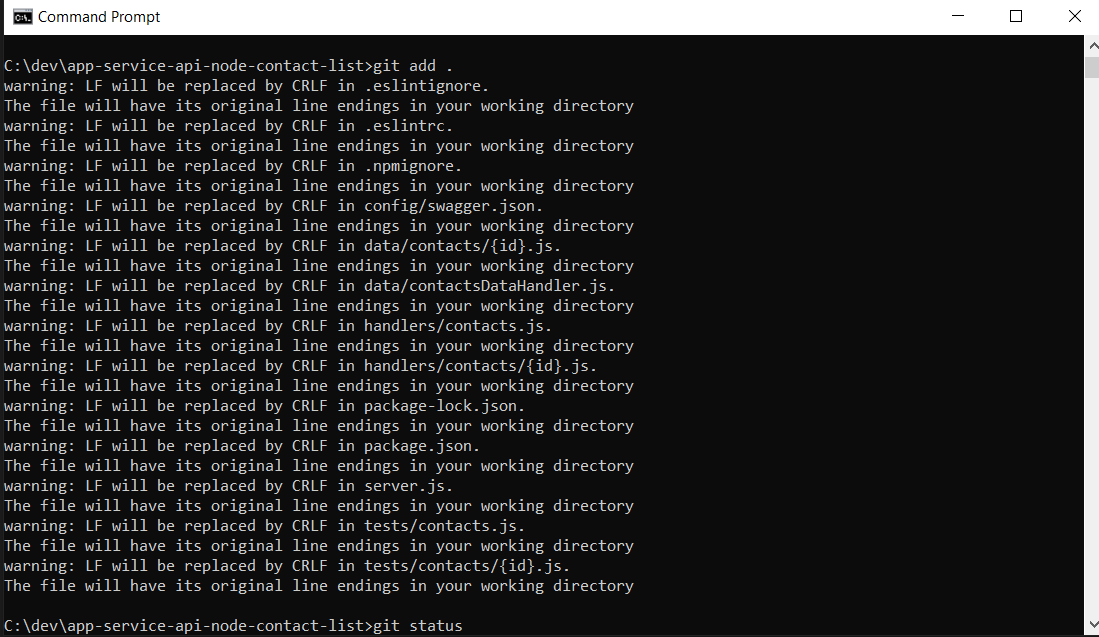
that the files under node_modules would be excluded (the next screenshots are from a command prompt, good way to avoid problems of credentials cache in VS code)
then type
git add .
to add all the files references to the future deployment
All the files of node_modules should not be taken into account thanks to the .gitignore file.
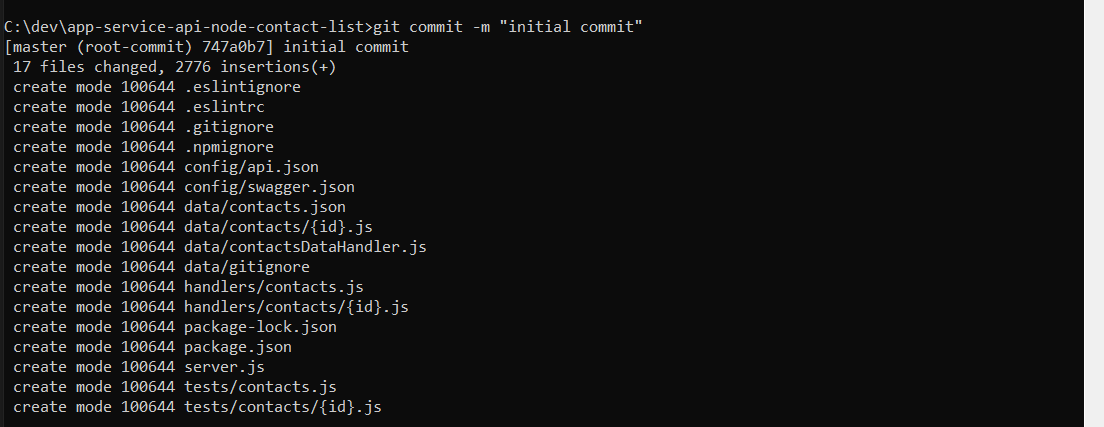
Now commit all the changes to prepared them to be pushed in Azure. All is new so type:
git commit -m "initial commit"
When the commit is finished, it's time to deploy, so we are going to add the reference to our Azure App Service
Go back to the "Try Azure App Service" welcome page were the countdown is running and pick the git url by clicking on the "clone or push with git" button. Copy the url in your clipboard.
Then type
git remote add AzureWebApp
and right click the Integrated Terminal to paste the Azure App Service git url
then for deploying, type:
git push AzureWebApp
The git command will correct you and you will be able to execute the right command.
Deployment is starting. Kudu, the Azure App Service build engine, warns you that it is updating the master branch of the Web App. The Azure Web App is a real git repo.
Then Kudu understands that a Node.js application is intended to be deployed
Then the files begin to be copied to the Web App folder: wwwroot.
then Kudu:
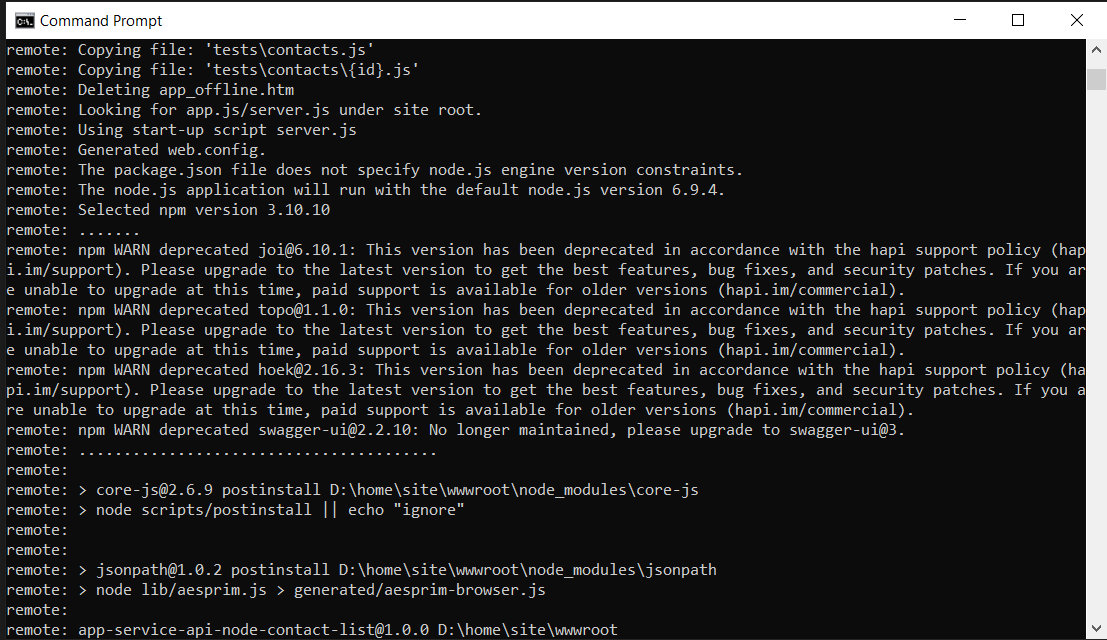
- creates the web.config file, (we are in a windows environment, no such file in linux)
- decides to take the server.js file as iisnode. Sometimes, it seems that if the node.js version is fixed, Kudu creates a iisnode.yml file to manage the good execution of the node.js application within the Azure Web App. In this deployment, no iisnode.yml file was created. Just a web.config (no iisnode.yml file neither in a Linux Web App).
- checks a reference for the node version, doesn't find in the package.json, decides the best version to use for node and npm, checks the packages, warns you to the packages to update.
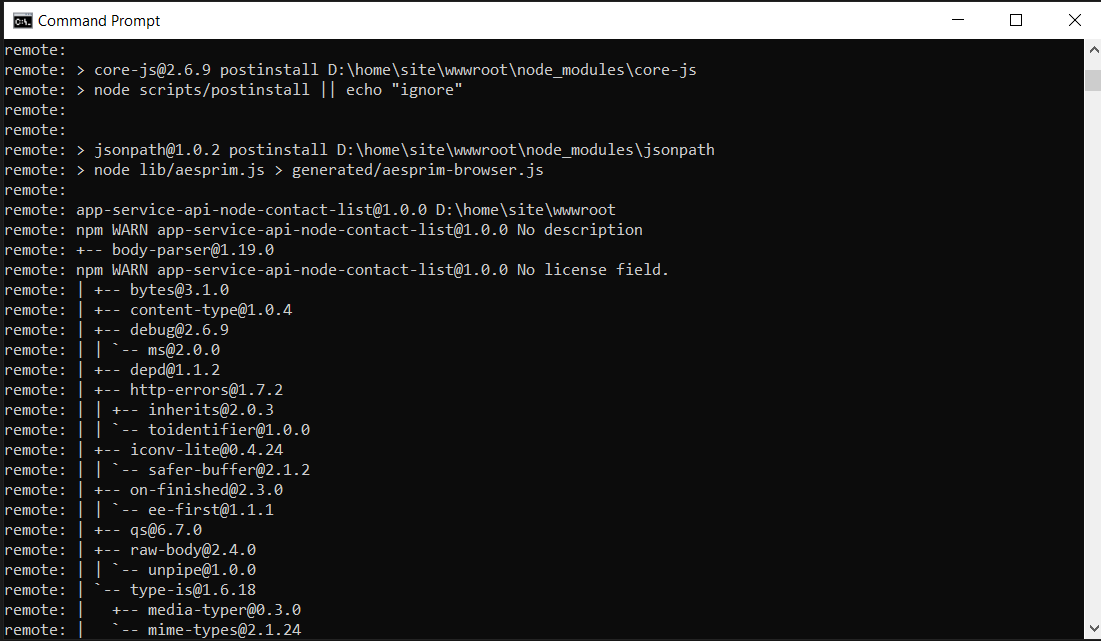
Then Kudu performs an NPM install to get all the Node.js packages required for the API:
The deployment is successful.
We can check the deployment by visiting Kudu:


You can see the files of the API and the web.config file created by Kudu during the deployment.
and you can even edit this file and other online.
Testing the deployement
For testing the API after the deployment, just click on its url on the Try App Service welcome page:
You will get an error on the root site because we didn't implement the GET / site route, but if you complete the root site url with /contacts you will have the pleasure to notice that everyhting is ok.
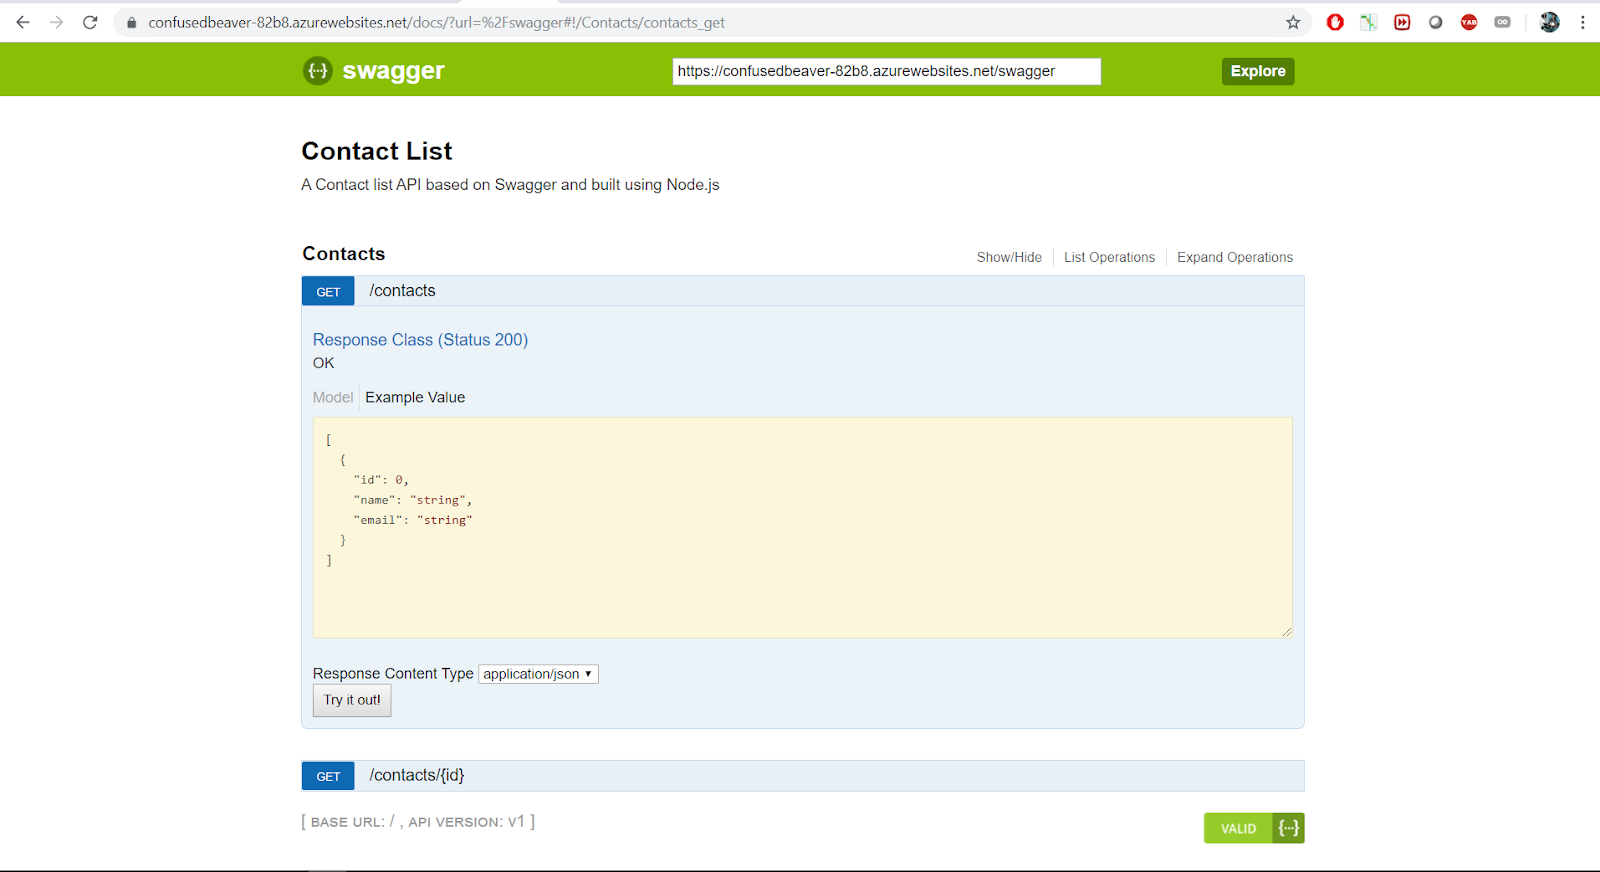
Testing the Azure REST API with swagger
Last we can use swagger to test our API online.The correct syntax for the Url to display our API in Swagger UI is
yourAzureAppUrl/docs
Enjoy folks!

No comments:
Post a Comment