I am very happy to publish a post where I can use the brand new Office 365 unified API to embed a conversation of the brand new Office Group into a SharePoint Online page!


1 - Architecture
A SharePoint Online html page sends an Ajax request to the Office 365 Unified API and get the data of the Office Group.(The SharePoint Online site and the Office Group belong of course to the same Office 365 tenant).
It seems simple at first but it wasn't possible since recently. Why?
Because of the different hostheaders of the different part of Office 365, You can check while navigating through Office 365. For example, recently I created an Office 365 environment and first registered as contososoftware. My domain was contososoftware.onmicrosoft.com. Then I had to buy a domain to activate Yammer (You should have a verified domain in Office 365 to have Yammer activated to Enterprise. The "onmicrosoft.com" is not a domain but an Office 365 tenant name or a default domain and cannot be used to activate Yammer Enterprise. So I bought marccharmois.com.
(roughly 14 US$ a year, not a big deal). After that, when I go to
- My mail, My calendar, My contacts (people), My Tasks, the Url starts with https://outlook.office.com/owa/?realm=marccharmois.com#path=
- NewsFeed, OneDrive, Sites, Delve, Video, the Url starts with https://contososoftware-my.sharepoint.com/
- Yammer, the Url starts with https://www.yammer.com/marccharmois.com/
- a SharePoint Online site, the Url starts with https://contososoftware.sharepoint.com/
So if I want to deploy an html page somewhere Online in Office 365 and make an Ajax request to a part that has a different hostheader (for example displaying some of my mails into a SharePoint Online page), it normally doesn't work because crosss domain Ajax requests are forbidden by the browsers. It is worse if my HTML page is deployed on a server.
Cross-origin resource sharing (CORS) is a mechanism that allows that. CORS defines a way in which a browser and server can interact to safely determine whether or not to allow the cross-origin request. It allows for more freedom and functionality than purely same-origin requests, but is more secure than simply allowing all cross-origin requests. It is a recommended standard of the W3C. (Wikipedia)
Of course Microsoft sets up Cors within Office 365 in order developers to be allowed to performed Ajax requests without being bothered by the different hostheaders of Office 365.
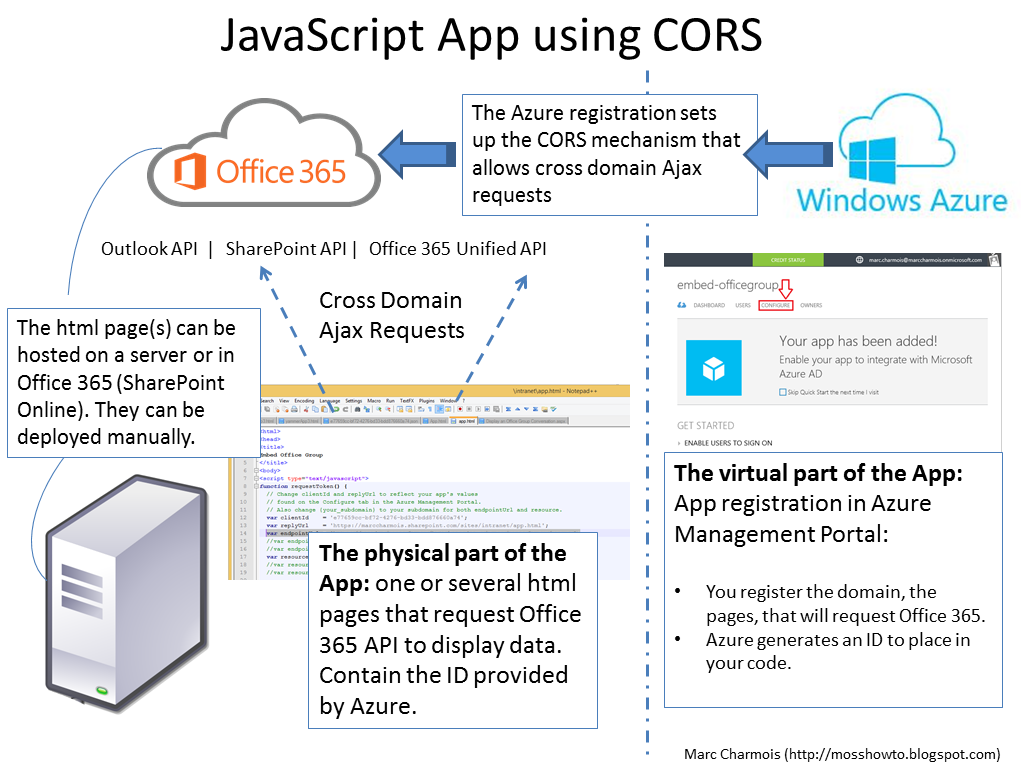
The CORS of Office 365 is based on Microsoft Azure:
- You register an App in Azure and you are provided with ID's that you place in your code.
- In the Azure App, you also reference the Urls of the pages that are planned to call the Office 365 API with cross domain requests
This double registration allows the CORS of Office 365 to properly work and also manage the oauth authentication.
That leads to the fact that the term "Application" or App has a double meaning. It could be:
- The pages that you have deployed somewhere on a server or within the Office 365 cloud (for example SharePoint Online) and that performs the Ajax requests and displays the data. Let's call this the physical part of the App, or the physical App
- The Application that you had to add to Azure for getting the Office 365 CORS and the oauth authentication to work. Let's call that the virtual part of the App, or the virtual App
In the case of this tutorial, my physical App is just an html page added to a SharePoint Online team site using explorer mode (WebDAV protocol)
It is very similar of what I did when
I embedded a Yammer conversation within SharePoint Online. This is super convenient because I can program and deploy quickly a physical App in Office 365 based on an html page that uses only Javascript!
It could seem a little bit difficult to understand at this point of the post, but I will explain all the operations to do it step by step with all the detailed screenshots as usual, so don't worry. I also did a diagram that can summarize all this in a clearer way:
2 - What you need to do this tutorial
You need:
Once you can access to an Office 365 environment using a business account with global administrator privileges, the first thing you need to do is register your application with Azure AD.
3 - Creating the (virtual) App within Microsoft Azure
3.1 Create a new subscription to Microsoft Azure
To Navigate to the Azure Portal you can use this link:
https://manage.windowsazure.com/
you can also access to it within 0ffice 365:
Log on to Office 365. From the Home page, select the Admin icon to open the Office 365 admin center.

In the menu page along the left side of the page, scroll down to Admin and select Azure AD.

If prompted, log in using the credentials you created for your O365 subscription.

After logging in, you should see a screen notifying you that you do not have a subscription

Create a new subscription.
If you're using a trial version of Office 365, you'll see a message telling you that Azure AD is limited to customers with paid services. You can still create a trial 30-day Azure subscription at no charge, but you'll need to perform a few extra steps:
Select your country or region, and then choose Azure subscription.
Enter your personal information. For verification purposes, enter a telephone number at which you can be reached, and specify whether you want to be sent a text message or called.
Once you've received your verification code, enter it and choose Verify code.
Enter payment information, check the agreement, and select Sign up.
Your credit card will not be charged.
Do not close or refresh your browser while your Azure subscription is being created.
Once your Azure subscription is created, choose Portal.
The Azure Tour appears. You can view it, or choose X to close it.
You should now see all items in your Azure subscription. It lists a directory with the name of your Office 365 tenant.
3.2 Register your App in Azure Management Portal
Once signed in, follow these instructions:
Click the Active Directory node in the left column and select the directory linked to your Office 365 subscription.

Select the Applications tab and then Add at the bottom of the screen.


On the pop-up, select Add an application my organization is developing.

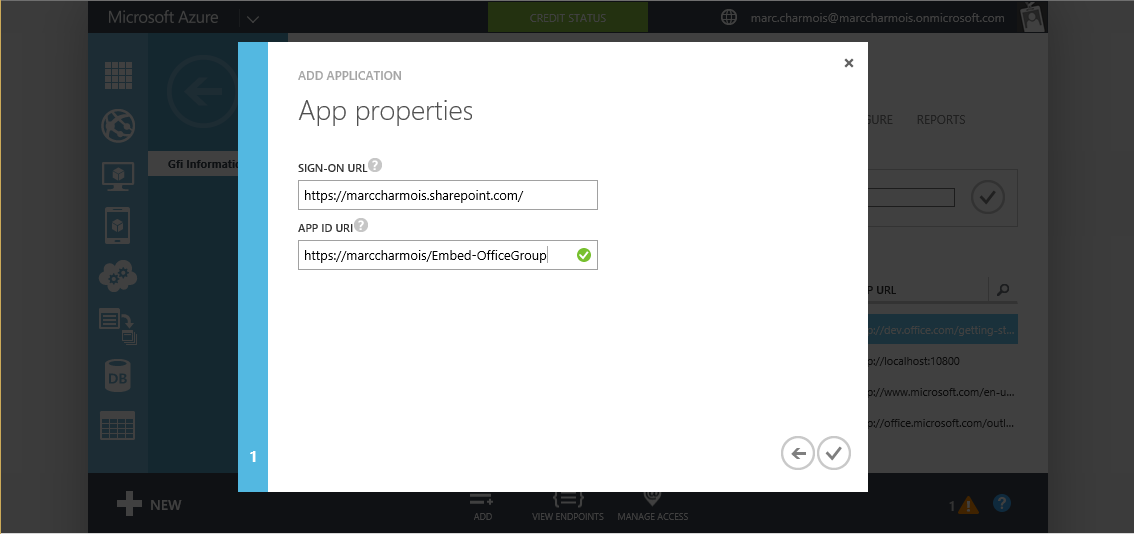
Choose an explicit name for your app,(I took Embed-OfficeGroup), and select Web application and/or web API as its Type. Then click the arrow to continue.

The value of Sign-on URL is the URL where your application will be hosted. As I will call the App using JavaScript within a SharePoint page, I put the Url of my SharePoint site.
The value of App ID URI is a unique identifier for Azure AD to identify your app. You can use http://{your_subdomain}/{YourAppName}, where {your_subdomain} is the subdomain of .onmicrosoft you specified while signing up for your Office 365 Developer Site. Then click the check mark to provision your application. For example, my Office 365 global admin account is, in this tutorial case:
marc.charmois@marccharmois.onmicrosoft.com

Now that your app has been provisioned, select the Configure tab.

Scroll down to the permissions to other applications section and click the Add application button.

In this tutorial, we want our App to read the conversation of an Office group. To access to the Office Group we have to use the new Office 365 Unified API.
Click the plus sign in the application's row and then click the check mark at the top right to add it. Then click the check mark at the bottom right to continue.

In the Office 365 Unified API row, select Delegated Permissions, and in the selection list, choose Read All Groups.

Click Save to save the app's configuration.

 3.3 Configure your app to allow the OAuth 2.0 implicit grant flow
In order to get an access token for Office 365 API requests, your application will use the OAuth implicit grant flow. You need to update the application's manifest to allow the OAuth implicit grant flow because it is not allowed by default.
Select the Configure tab of your application's entry in the Azure Management Portal.
Using the Manage Manifest button in the drawer, download the manifest file for the application and save it to your computer.


Open the manifest file with a text editor. Search for the oauth2AllowImplicitFlow property. By default it is set to false; change it to true and save the file.

Using the Manage Manifest button, upload the updated manifest file.


You've now successfully registered your application with Azure AD.
4 - Coding the SharePoint page (physical App) that's using the Azure App (Virtual App)
4.1 Creating the app.html page
In your 0ffice 365 environment, create a new site collection. Once it's done, navigate to the "Site Assets" library. Open the library in Explorer mode

and using the window navigate to the root folder of your site. Create an html page within the folder and name it app.html

You can now open this page with Visual Studio or Notepad ++ and start to programm the displaying of the Office Group conversation
 You can find the complete app.html page
 in the
dedicated Github repository
4.2 Determine the resource endpoint
In order to make any API requests, you'll need to determine the correct endpoint of the resource you want to use. The endpoint you'll use is determined by what information you want from Office 365. Refer to the API reference documentation to get the endpoint you want.
Mail API reference
Contacts API reference
Calendar API reference
Files API reference
Alternatively, you can take advantage of the Office 365 unified API (preview) to access all of the APIs from a single endpoint, https://graph.microsoft.com. Refer to the Office 365 unified API reference to browse all of the supported endpoints.
For this sample, we will use the Office 365 unified API to get a conversation of an Office Group. The endpoint for this operation is
https://graph.microsoft.com/beta/{your_domain}/groups, where {your_domain} is the domain you specified while signing up for your Office 365 Developer Site. In my case marccharmois.onmicrosoft.com.
My endpoint is: https://graph.microsoft.com/beta/marccharmois.onmicrosoft.com/groups
4.3 Get an access token from Azure
Office 365 uses OAuth 2.0 tokens issued by Azure AD to authenticate JavaScript clients. Tokens are obtained using the OAuth 2.0 implicit grant flow. Using implicit grant, your application requests an access token from Azure AD for the currently signed-in user by sending the user to an authorization URL where the user signs in with their Office 365 credentials and then is redirected back to the app with the access token in the URL.
The following function builds the authorization URL and navigates to it to begin the authentication process.
function requestToken() {
  // Change clientId and replyUrl to reflect your app's values
  // found on the Configure tab in the Azure Management Portal.
  // Also change {your_subdomain} to your subdomain for both endpointUrl and resource.
  var clientId    = 'e77659cc-bf72-4276-bd33-bdd876660a74';//ID of your App in Azure
  var replyUrl    = 'https://marccharmois.sharepoint.com/sites/intranet/app.html'; //my sharepoint page that requests an oauth 2 authentification and data
  //It is also referenced in the REPLY URL field of my App in Azure
  var endpointUrl = 'https://graph.microsoft.com/beta/marccharmois.onmicrosoft.com/groups';
  //var endpointUrl = 'https://marccharmois-my.sharepoint.com/_api/v1.0/me/files';//getting files from SharePoint
  //var endpointUrl = 'https://outlook.office.com/api/V1.0/me/messages';//getting messages  from outlook
  var resource = "https://graph.microsoft.com/";
  //var resource = "https://marccharmois-my.sharepoint.com"; //getting files from SharePoint
  //var resource = "https://outlook.office.com"; //getting messages  from outlook

  var authServer  = 'https://login.windows.net/common/oauth2/authorize?';
  //var authServer  =  'https://login.microsoftonline.com/common/oauth2/authorize?';//this works either
  var responseType = 'token';

  var url = authServer +
            "response_type=" + encodeURI(responseType) + "&" +
            "client_id=" + encodeURI(clientId) + "&" +
            "resource=" + encodeURI(resource) + "&" +
            "redirect_uri=" + encodeURI(replyUrl);

  window.location = url;
}
At this point what's going on?
When I use this function, I am redirected to the same page, but with the acces token in the Url as a parameter:


I can even display the token
var urlParameterExtraction = new (function () {
  function splitQueryString(queryStringFormattedString) {
    var split = queryStringFormattedString.split('&');
    // If there are no parameters in URL, do nothing.
    if (split == "") {
      return {};
    }
    var results = {};
    // If there are parameters in URL, extract key/value pairs.
    for (var i = 0; i < split.length; ++i) {
      var p = split[i].split('=', 2);
      if (p.length == 1)
        results[p[0]] = "";
      else
        results[p[0]] = decodeURIComponent(p[1].replace(/\+/g, " "));
    }
    return results;
  }
  // Split the query string (after removing preceding '#').
  this.queryStringParameters = splitQueryString(window.location.hash.substr(1));
})();


function displayToken(){
// Extract token from urlParameterExtraction object.
var token = urlParameterExtraction.queryStringParameters['access_token'];
alert('token : \n'+ token);
}

Now that I have the token, here is the code to request the Office 365 Unified API to get all the specific conversation of an Office Group:
function getToken(){

var token = urlParameterExtraction.queryStringParameters['access_token'];
return token;
}

function getGroupsFromO365() {
  try
  {
    //var endpointUrl = 'https://graph.microsoft.com/beta/marccharmois.onmicrosoft.com/groups'; //getting all groups to get the ID of the group you want
 //var endpointUrl = 'https://marccharmois-my.sharepoint.com/_api/v1.0/me/files';//getting files from SharePoint
 //var endpointUrl = 'https://outlook.office.com/api/V1.0/me/messages';//getting messages from SharePoint
 var endpointUrl = "https://graph.microsoft.com/beta/contoso.com/groups('4eba7454-b490-46ae-bb5e-774efaec7c6f')/conversations('AAQkADZjOTdkMTIwLWFjNTItNDUyYy05MTc4LTg1NmJmMDk1MjYxOQAQAD_Ql6WI-GlHs3VmVZsV3QA=')/threads('AAQkADZjOTdkMTIwLWFjNTItNDUyYy05MTc4LTg1NmJmMDk1MjYxOQMkABAAP5CXpYj8aUezdWZVmxXdABAAP5CXpYj8aUezdWZVmxXdAA==')/Posts";

    var xhr = new XMLHttpRequest();
    xhr.open("GET", endpointUrl);
    var myToken = getToken();
    // The APIs require an OAuth access token in the Authorization header, formatted like this: 'Authorization: Bearer '.
    xhr.setRequestHeader("Authorization", "Bearer " + myToken);

    // Process the response from the API.
    xhr.onload = function () {
      if (xhr.status == 200) {
     //alert('data received');
  var message="";
  var object = JSON.parse(xhr.response);
  for(i=0;i<object.value.length;i++){
  message+='From: ' + object.value[i].From.EmailAddress.Name + '<BR>';
  message+='At: ' + object.value[i].CreatedDateTime + '<BR>';
  message+= object.value[i].Body.Content + '<BR>';
  }
        //var formattedResponse = JSON.stringify(JSON.parse(xhr.response), undefined, 2);
        document.getElementById("results").innerHTML = message;
      } else {
        document.getElementById("results").textContent = "HTTP " + xhr.status + "<BR>" + xhr.response;
      }
    }
    // Make request.
    xhr.send();
  }
  catch (err)
  {
    document.getElementById("results").textContent = "Exception: " + err.message;
  }
}

Now, you can display this app.html into any SharePoint page by calling it within an iframe tag...
<span style="display:block;margin-bottom:3px;font-size;13px;">Embedded Office Group Conversation:</span> <iframe src="https://marccharmois.sharepoint.com/sites/intranet/app.html" style="height:400px;width=300px;border:solid 1px silver"></iframe>
As I did for this Web Part page;

5 - Aknowledgements