Showing posts with label Azure App Service. Show all posts

Friday, September 8, 2023

Get quickly an Azure API (PowerShell-function)

For a lot of reasons, you need sometimes to have an API for testing. I had this need recently for testing MSAL with Anguler.
So, here is a first way to quickly get an Hello World API working in Azure. It is based on Azure function, PowerShell stack.

Prerequisites

  • Access as contributor to an Azure subscription
  • Visual Studio Code installed within your device
  • Git installed within your device

Overview

We are going to use local Azure Function Core Tools to emulate a function locally and deploy it to azure.
For doing that, we need to:

Install .Net 6

Go to the .Net 6 download page
Install .Net 6

Install Azure Function Core Tools

Click this link to download the installation package

Clone the Hello World PowerShell function code from Github

Open a command prompt, locate your DEV directory and execute :
git clone https://github.com/dfinke/powershell-azure-function-helloworld.git

Let VS code install the Azure extension

You can then open it in Visual Studio code.

Visual studio will ask you to install the extension "Azure Function". Agree, and the extension will be installed and also the other extensions "Azure Resources" and "Azure Account", that allow you to:
  • sign in to Azure from Visual Studio Code
  • create new resources into Azure from Visual Studio Code
  • deploy code to Azure, like this one of the Azure Function PowerShell Hello World


  • Create an empty function into Azure

    Then, sign in to Azure using the Azure Account extension.


    The Azure Resources extension, then, will show you the subscriptions of your tenant.
    You can click on the "+" to create a new resource

    However, we are rather going to use the portal to create the function, because an Azure function needs to have an unqiue name and the portal can validate if our name is unique.

    So, go to the portal, display the rezsources of one of your subscription and start creating a function by clicking the "+" sign.
    Then search for function app.

    Choose a name that doesn't exist, select powershell for the stack, then accept all the following tabs.
    When your function creation is complete, click "go to the resource"
    You will find the Url of your Function App. And if you click it, it will respond while there is not working API yet.

    execute the function locally


    Go back to your local environment, and, from the command prompt navigate to the code directory
    cd "powershell-azure-function-helloworld"
    
    launch the function
    func start
    
    If you paste into a browser `http://localhost:7071/api/powershell-azure-function-helloworldHttpTrigger` you will see the function API working locally:

    Deploy the function code into Azure

    Now that we have an empty function within Azure, we can use VS code to deploy our local code into it.
    Go back to VS code and right click the subfolder of the code of the PowerShell function : powershell-azure-function-helloworldHttpTrigger
    Then, at the bottom of the context menu: "deploy to function App"
    You can then, choose the subscription where the Azure function you want to deploy to, is:
    Then, we locate the helloworldfunction1123 we have previously created in Azure:
    We accept to deploy:
    And, finally, we can see the deployment in action:
    And follow it in the Output pane of VS code untill it is complete:
    BTW: I had to deploy twice to get it complete. It failled the first time
    Now, if we go back to Azure portal, we can see our PowerShell function avaolable:
    If we click on the Name Link of our function, we are redirected to a view where we can get the function Url to call it:
    and if we paste the link in a browser, our function is responding and sends us the content:
    We have now an API in Azure based on PowerShell function that we can use for testing purpose, like authentication, MSAL, etc.
    Well done!

    Wednesday, September 11, 2019

    Deploy a Flask Restplus API to an Azure Linux Web App

    Topic:

    Deploy a python Flask Restplus API to an Azure Linux Web App (code available in my github repo: app-service-Linux-API-Python )

    Tutorial

    I will publish soon :
    • the steps and screenshots to configure your local (windows) environment for Python
    • the deployment steps and screenshots
    the Web App creation steps and screenshots are the same than those of the previous post
    The deployment steps are quite the same excepted that you clone the code from the git repo and add a remote to the Azure Web App.

    Deployment steps

    roughly:
    • Create an Azure Linux Web App (App service on Linux)
    • Go to deployment center and chose : Git local, App Service build engine
    • clone the code of my repo: app-service-Linux-API-Python
    • Add the WebApp git url of the deployment center as a remote
    • Push the code to the Web App. When asked for credentials go to FTP/Credentials an copy Username and Password. The Username to use begins by the $, don't take the domain.


    After deployment

    this is the result after deployment:


    It is online with anonymous access, you can play with it:

    try the Flask Restplus features

    Enjoy!

    Monday, September 9, 2019

    Build a Node.js application and deploy it (git push) to an Azure Linux Web App (Azure App Service on Linux)

    Topic

    This post shows how to create a Node.js Express application and deploy it to an Azure Linux Web App using a git push.

    Prerequistes

    You must have:

    Creating the Azure Linux Web App via the portal

    Sign-in to Azure Portal and click on "Create a resource" (1), then Web App (2).


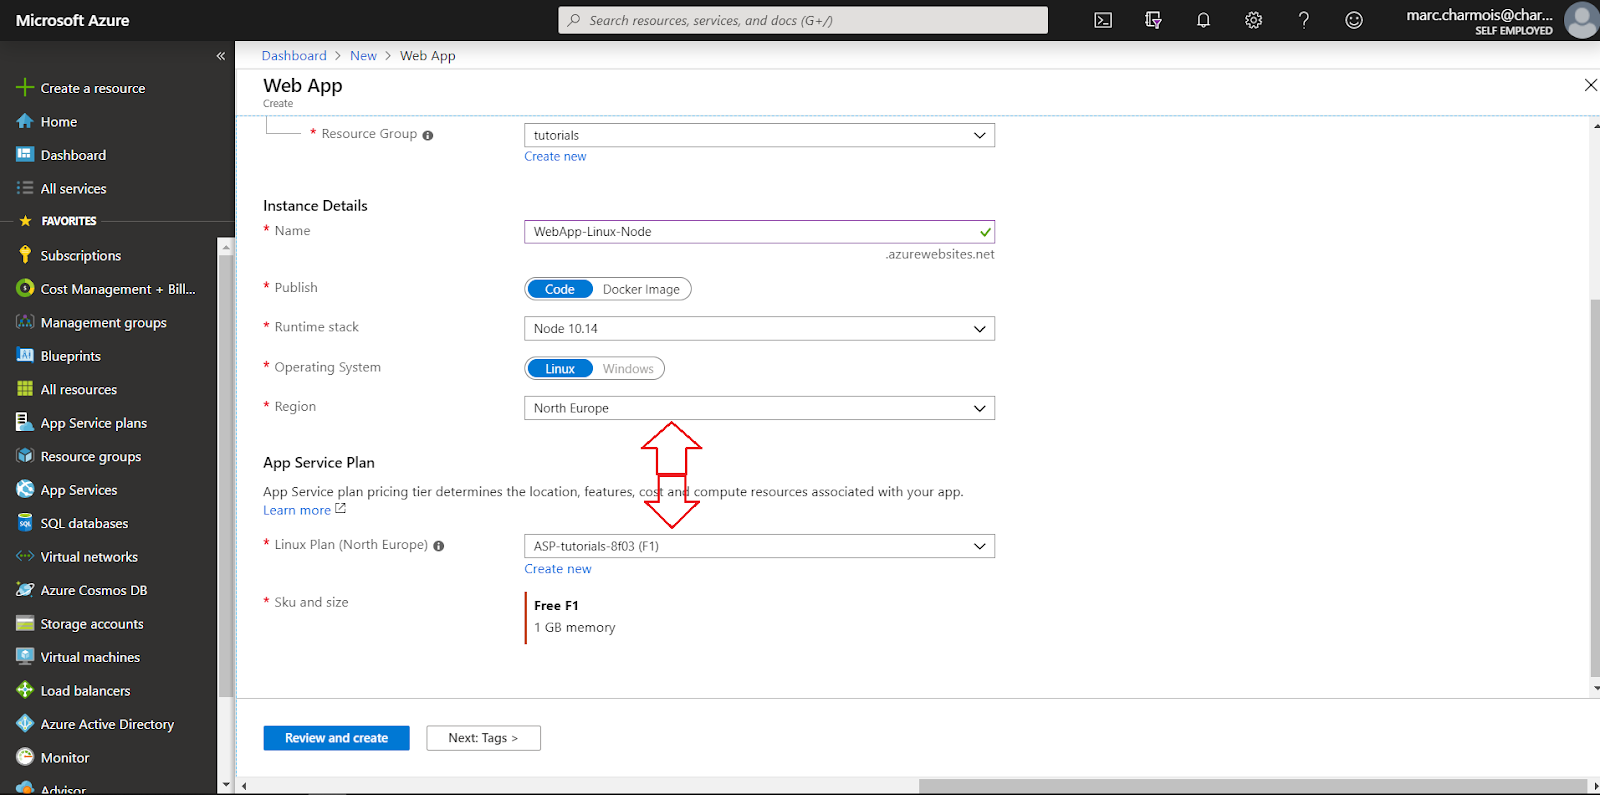
    Chose your Subscription, your Resource Group, your Azure Web App name, and let the other values unchanged because by default the Web App creation pane is configured for "Code" and "Linux".


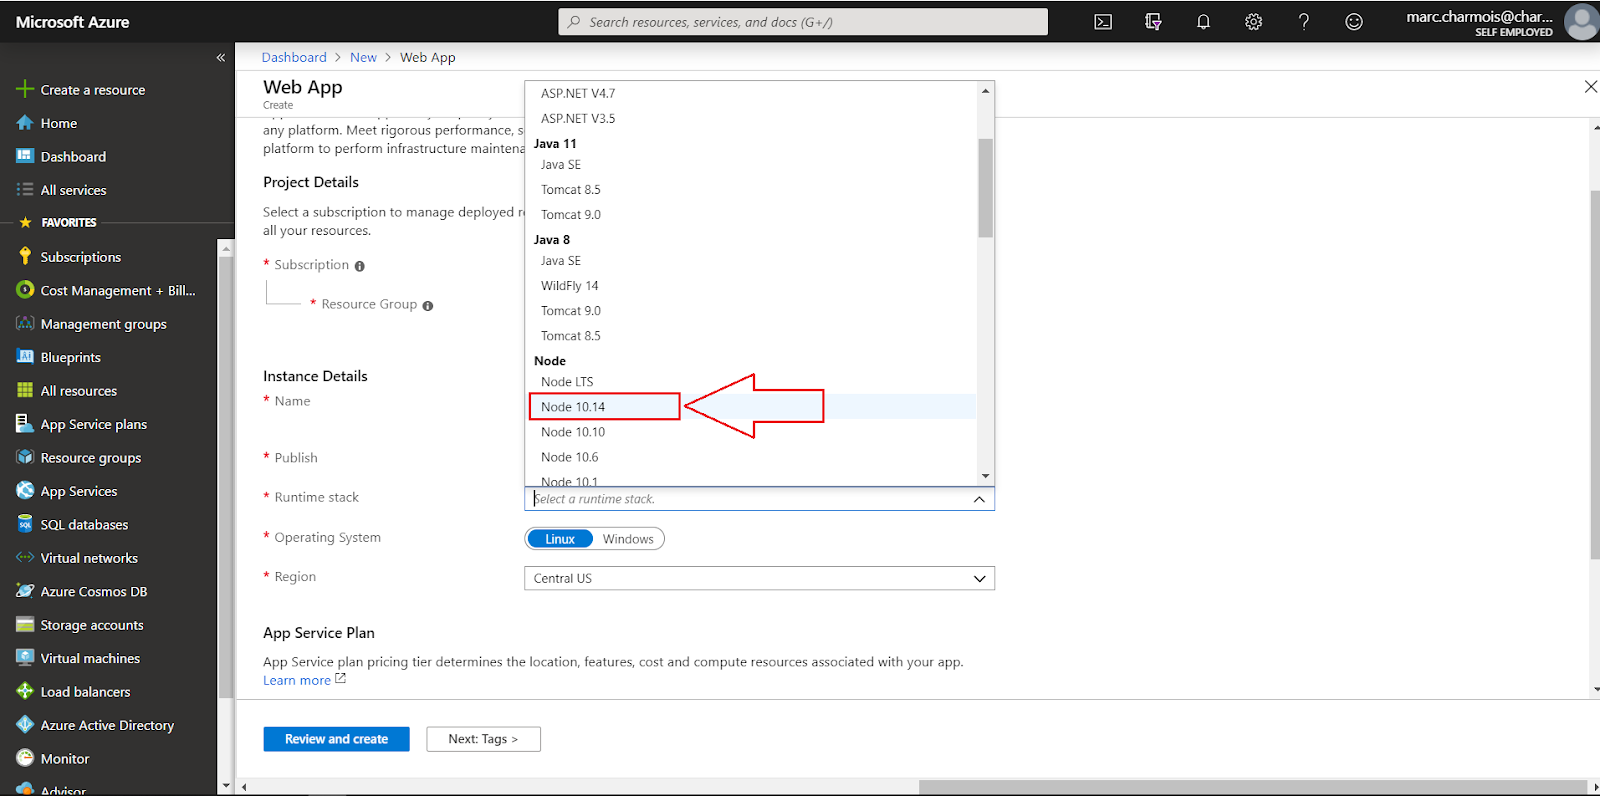
    Then, chose your stack. I took Node 10.14 but it seems it's better to take Node LTS (newer).


    Then, chose your App Service Plan. You can have just one Free App Service Plan for Linux Azure Web App. As I have already, previously, created an Azure Web App for containers based on Linux and it is only available in North Europe (not yet in France), I had to based my free Linux sService Plan on North Europe. So for this new Linux Azure Web App I had no other choice than chosing North Europe as the region, in order to take benefits of the free App Service Plan for Linux.


    Review and create page summarizes your choices before creating the Azure Web App. Then, click on Create.


    You can then follow the steps of the Azure Web App creation.


    Until it's complete.


    Go then to the "Overview" page of your brand new Azure Linux Web App, And click on the Azure Web App Url to test it:


    Exploring the Azure Linux Web App with SSH tool

    Locate the SSH tool in the development tools section of your Web App menu and open it.


    You, then, can use the "cd" command to navigate through the folders hierarchy and "ls" to list their content. ("dir" works also). You notice that in wwwroot folder, we only have the hostingstart.html page that displayed previously when testing the Azure Linux Web App.

    Creating the Node.js Express Application

    Open a command prompt, navigate to your development folder, and install Express Generator by typing:
    npm install -g express-generator


    Then, create locally your Node.js Express application by typing:
    express WebApp-Linux-Node --view pug --git


    As adviced by the creation program, change directory to go to the Node.js Express application code directory, install the dependencies:
    cd WebApp-Linux-Node
    npm install


    Then, start the Node.js Express application locally by typing:
    npm start
    
    
    and opening this url in a browser:
    http://localhost:3000


    Deploying the Node.js Express application to an Azure Linux Web App

    Setting the deployment mode

    Locate the deployment center menu item of your Azure Linux Web App in the Azure Portal and oepn it.


    Select "Local Git" then click on "Continue" button.


    Select then, App Service build engine (Kudu) and click "Continue" button.


    The App Service build engine of the Azure Kudu provides you with a git Url. You can:
    • clone it to add file locally to the repo and push them to your Azure Web App
    • or use it to add a remote to your existing git repo (it is that we are going to do)
    Kudu behaves as a real git repo integrated to the Azure Web App. You will see more later after deployment.


    click then on the "FTP Credentials" horizontal menu item to copy your credentials


    Paste them to a txt file for later.


    Deploying the Node.js application to the Azure Linux Web App

    Go back to your command prompt and add a git file to your repo by typing:
    git init .


    then, add your files to the deployment scope:
    git add .


    commit this adding:
    git commit -m "initial commit"


    add the Azure Web App git url as a remote destination to your Git configuration:
    git add remote add AzureWebApp <git url in the deployment center overview>


    finally push your files to the Linux Azure Web App
    git push --set-upstream AzureWebApp master


    You are prompted for your crendentials. Use the ones pasted previously.


    This is the deployment screen shot. You can notice that Kudu builds the code, executes commands like npm install...


    Finally, if you go back to the Deployment Center of your Linux Azure Web App, you see the trace of the deployment just as if the Deployment Center was a git repo with the message of your last commit!


    You can go to the overview page of your Linux Azure Web App to click the Url of the Web App.


    And check that the Linux Azure Web App is serving your Node.js application successfully!


    Using the SSH tool to check the deployment

    You can now navigate with the SSH tool to check your Web App folders and see the files:


    for example the www file in the bin folder. Notice that the 3000 port has not been changed and that the application is running anyway, the Web App take set the port using the process.env.PORT.


    We can also open the oryx manifest that has been created during the deployment


    and check the deployment logs:
    home > logFiles > Kudu > deployment


    Performing development on the Express API

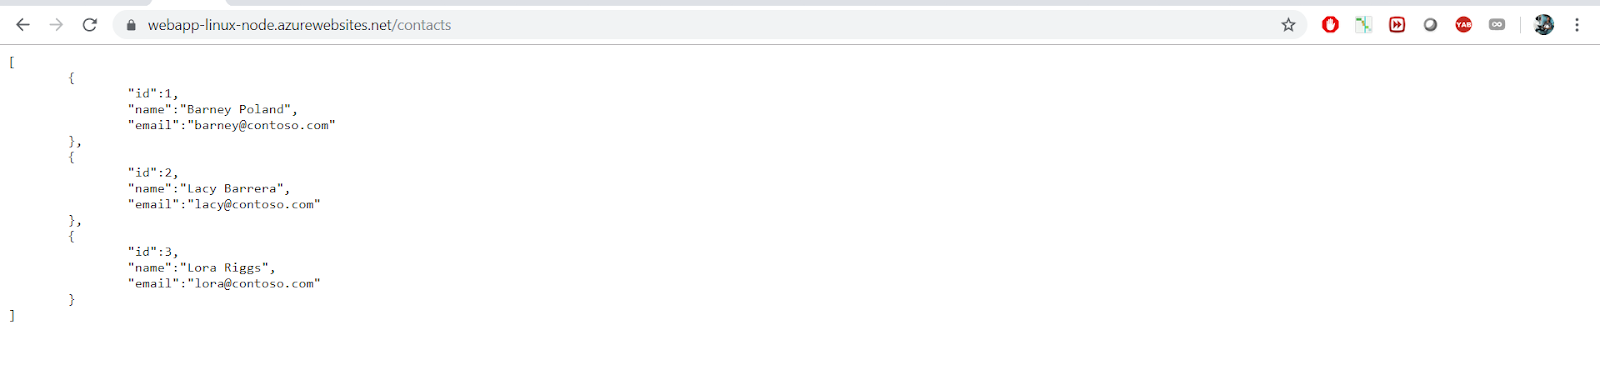
    Assume we want now to display a contact list from our API. You can find the complete source code of this sample in my github repo: app-service-linux-api-node-sample.

    1. Adding routes to app.js

    Open app.js in a code editor and define a new route for your contactlist:
    var indexRouter = require('./routes/index');
    var usersRouter = require('./routes/users');
    var contactsRouter = require('./routes/contacts');//adding a router for contacts
    
    
    var app = express();
    
    
    // view engine setup
    app.set('views'path.join(__dirname'views'));
    app.set('view engine''pug');
    
    
    app.use(logger('dev'));
    app.use(express.json());
    app.use(express.urlencoded({ extended: false }));
    app.use(cookieParser());
    app.use(express.static(path.join(__dirname'public')));
    
    
    app.use('/'indexRouter);
    app.use('/users'usersRouter);
    app.use('/contacts'contactsRouter);//adding a route for contacts
    

    2. Adding the data

    Create a folder at the root of your API and name it data. Create a json file named contacts.json in this folder.


    This is the json to paste in the file:

    [
        {
            "id":1,
            "name":"Barney Poland",
            "email":"barney@contoso.com"
        },
        {
            "id":2,
            "name":"Lacy Barrera",
            "email":"lacy@contoso.com"
        },
        {
            "id":3,
            "name":"Lora Riggs",
            "email":"lora@contoso.com"
        }
    ]


    3. Create the route

    Create a contacts.js file in the "routes" folder:


    This is the js code to paste in:

    
    var express = require('express');
    var router = express.Router();
    
    router.get('/'function(reqresnext) {
      res.sendFile("/data/contacts.json",{ root: "./" });
    }) 
    
    module.exports = router;


    4. Testing locally

    you can then test your new code locally by executing a npm start:


    and browsing to :
    http://localhost:3000/contacts


    4. Deployment to the Azure Linux Web App

    You can then push your code to the Azure Linux Web App


    I had to restart the Web App after deployment to see the new feature of the Linux Web App Node.js API working:


    You can see the trace of your new deployment in the deployment center of your Azure Web App


    keep developping with Azure App Service Extension for Visual Studio Code

    Regarding Windows Azure Web App we have good online tools to develop online. Regarding Linux, don't hesitate to use this super cool feature of VS code to connect to your tenant and keep developping from your desktop:


    references

    This post is based on this Microsoft documentation.

    Source code available in my github repo: app-service-linux-api-node-sample.