Showing posts with label branding. Show all posts

Friday, October 16, 2015

Branding a SharePoint Online team site using the SharePoint JavaScript Object Model

In this post I will show how to use the JavaScript library code (JavaScript Client Object Model: SP.Runtime.js and SP.js) for easily branding a SharePoint Online team site while respecting the new pattern and practices. This is a third approach compared with the two ones currently recommended by Microsoft for SharePoint Online, that is to mean: NCSSs versus Add-Ins.

I will show in the following tutorial how to easily perform some of the main operations done by the Add-in while avoiding most of the Add-In way complications.

For a complete round regarding the classical approaches, you can visit this post: Branding a SharePoint Online Team Site
You can also read this post that gives a more accurate overview of the recommendations: Latest Advice on Office 365 Branding.


1 - Add-ins versus NCSSs

If you read carefully the MSDN documentation (updated August 2015 the 12th) exposing the recommendations regarding the use of the No-Code Sandboxed Solution or NCSS (aka a .wsp containing no server code and deployed in the Solution store at the Site Collection level), versus the use of the SharePoint Add-Ins (formerly called Apps for SharePoint), you can summarize it with the following conclusions:

Microsoft recommends to use Add-Ins whenever you can, but recommends NCCSs for branding as the easiest way to do it.

Regarding the Add-In approach, you can already review the material available on the Office 365 Developer Patterns and Practices:

Video on Channel 19: Alternate CSS and set site logo

Associated source code for the Add-In available on GitHub

You will notice that in the Office 365 Developer Patterns and Practices sample, the Add-In :
  • Change programmatically (Imperative approach) the logo and the CSS references for the site

    web.AlternateCssUrl = web.ServerRelativeUrl + "/SiteAssets/contoso.css";
    web.SiteLogoUrl = web.ServerRelativeUrl + "/SiteAssets/pnp.png";
    web.Update();
    web.Context.ExecuteQuery();

  • Upload programmatically (Imperative approach) the logo and the CSS files for the site

    // Use CSOM to upload the file in
    FileCreationInformation newFile = new FileCreationInformation();
    newFile.Content = System.IO.File.ReadAllBytes(cssFile);
    newFile.Url = "contoso.css";
    newFile.Overwrite = true;
    Microsoft.SharePoint.Client.File uploadFile = assetLibrary.RootFolder.Files.Add(newFile);
    web.Context.Load(uploadFile);
    web.Context.ExecuteQuery();

    // Get the path to the file which we are about to deploy
    string logoFile = System.Web.Hosting.HostingEnvironment.MapPath(
    string.Format("~/{0}", "resources/pnp.png"));

    // Use CSOM to upload the file in
    newFile = new FileCreationInformation();
    newFile.Content = System.IO.File.ReadAllBytes(logoFile);
    newFile.Url = "pnp.png";
    newFile.Overwrite = true;
    uploadFile = assetLibrary.RootFolder.Files.Add(newFile);
    web.Context.Load(uploadFile);
    web.Context.ExecuteQuery();

Then you can figure out the pros and the cons of these two approaches:

Add-Ins:
  • The pros
    • no impacts regarding Microsoft updates:
      As Add-Ins are using imperative approach (doing things programmatically) the OOTB templates of SharePoint (Web Part Page Templates, Page Layouts, default.aspx page, Master Pages) are preserved so as any update from Microsoft regarding these templates will have no impacts on the customizations performed using Add-Ins. That is to mean: no custom Master Page anymore, no CAML anymore, ever!
    • The branding action could be perform by a super user:
      It seems that you can leverage the permission for the users just for the use of the Add-In so as the users to be able to activate the branding of a site themselves without belonging to the Site Collection Administrators.
  • The cons
    • NCSSs are more powerful:
      As Add-Ins are using imperative approach (doing things programmatically) and NCSSs can use both imperative (Client side of course with SharePoint JavaScript library code) and declarative approach (modifying HTML, CSS within the custom templates and CAML for deploying and registering these custom templates in the libraries), there are numerous things that you can do with NCSSs that you cannot do using Add-Ins. That is to mean: custom Master Pages, custom pages, with all the HTML and the server controls you want within the custom pages.
    • Add-Ins require more time and more knowledge:
      Add-In model is completely new and different from classical approaches, thus technical team will have to enhance knowledge to be really comfortable with these new approaches. As said in the MSDN documentation when using Add-Ins remote imperative approach "it would take a considerable amount of work to create this code".
      Not only the SharePoint team will be involved, but also people working in the infrastructure and network areas because setting the necessary things regarding network and authentication for getting Add-ins work properly in a company requires also time and knowledge.
No-Code Sandboxed Solutions (aka NCSSs):
  • The Pros
    • Although the new Add-Ins model for SharePoint (formerly called Apps) is documented by Microsoft as the the recommended way for customizing SharePoint, you can see in the official MSDN documentation that among the scenarios recommended by Microsoft for using No-Code Sandboxed Solutions instead of Add-Ins (formerly called Apps), Branding of SharePoint Sites is one of them:

      [... SharePoint users often want to give their SharePoint sites, including their SharePoint Online sites, a custom appearance with their own colors, styles, layouts, and logos. This is generally easier to do with NCSSs than with SharePoint Add-ins.
      ...] MSDN SharePoint Add-ins compared with SharePoint solutions

      But NCSSs compared with Add-Ins are not only an easier way for branding a SharePoint Online site. Regarding branding, Add-Ins are more limited:

      [...
      A SharePoint Add-in has declarative control over the appearance of only its own add-in web. For the host web, it can declaratively add only ribbon buttons and menu items (and add-in parts). Any other changes to a host web or its parent site collection, tenancy, or on-premisesSharePoint web application has to be done with code or script that uses one of the SharePoint's client object models. For example, new icons or CSS files would have to be programmatically deployed. This code could be run from the add-in itself after it is installed, or it could run in the add-in installation event handler. But it would take a considerable amount of work to create this code.
      In addition, the add-in would need site collection-scoped permissions to change any websites outside its own add-in web and host web, and it would need tenant-scoped permissions to change more than just its parent site collection. A branding NCSS, however, can be deployed and activated to any site collection; and it could consist of only a few purely declarative components.
      ...] (MSDN)
  • The Cons
    • As your customized pages are not based on a OOTB SharePoint template anymore, if any update of the SharePoint templates is performed by Microsoft, these updates won't be taken into account by your customized page. You will miss new features of the product or maybe even lose current ones depending on the Microsoft updates. So you might perform sometimes unexpected maintenance operations for recovering all the features of the SharePoint product. (it might not be the case with custom master pages based on the use of the Design Manager with which you can convert an.html file into a SharePoint 2013 master page, a .master file. I have to check this more seriously. By the way, I planned to redo the same post using the SharePoint Publishing Features).
    • Using NCSS for branding a SharePoint Online team site will require the privileges of Site Collection Administrator and cannot be performed by a super user.
2 - A third approach: using JavaScript Object Model within a Site Page
I will show in the following tutorial how to easily perform some of the main operations done by the Add-in while avoiding most of the Add-In way complications. We will :
  • Upload the new logo of the site manually
  • Upload the new css of the site manually
  • Create the page for branding the site manually
  • Add Javascript code to the page in order to change automatically, the Logo, the css and the Master Page of the site.

2.1 Upload the new logo of the site manually

Use Bing or Google images to find a logo of the Contoso company. Try to find one based on a .gif or a .png with transparency (Contoso-Blue.png is fine).
When it's done, go to the SharePoint Online team site you want to customize (you can easily get a trial environement for 30 days). You need to be administrator of the Site Collection.
Then, create a folder called "images" in the site collection "Style Library" and Upload the Contoso logo image in the folder.


Don't forget to check in the logo image, in order visitors of the site will be able to see it. (if the logo image is checked out, only the administrator of the site will be able to see it).


2.2 Upload the new css of the site manually

Create a file called contoso.intranet.css and paste the following css within the file:

#siteIcon{margin-top:0px;}
#titleAreaBox{margin-top:0px;margin-left:20%;margin-right:20%;background-color:rgba(242, 242, 242, 1);}
#titlerow{background-color:rgba(242, 242, 242, 1);}
.ms-core-listMenu-horizontalBox{margin-top:30px;margin-left:-200px;}
.ms-breadcrumb-box {padding-top: 5px;padding-bottom: 5px;height:30px;}
#SearchBox{margin-left:200px;margin-right:-50px;}
#suiteBarDelta{margin:0px;margin-top:0px;}
#DeltaPlaceHolderSearchArea{padding-top:45px;}
.ms-srch-sb > input {width: 140px;}

Then, create a folder called "css" within the site collection "Style Library", and Upload the file within the "css" folder.


You can see that the .css file has been properly added within the folder, but it is checked out so only administrator will be able to see it. We have to check it in.


2.3 Creating the Site Page for branding the site

Navigate to the "Site Contents" page of your SharePoint Online team site, and locate the "Site Pages" library.


Open the Site Pages library and start creating a new Web Part page.


Call the page "Brand this Site"


The page appears in "edited" mode


Stop editing the page and note that the page was unexpectedly created within the "Site Assets" library.


2.4 Open the Site Page, using WebDAV protocol for modifying the source code

Now we are going to edit the page source code using WebDAV protocol. This is perfectly allowed since you will see in the page properties something called "Open with Microsoft SharePoint Designer".


If you have SharePoint Designer you can now open the page with it. If not, I will show you a trick to edit the page source code using the webDAV protocol with Notepad++. (Note that for me, depending on the machines I am working on, sometimes, clicking on the link "Open with Microsoft SharePoint Designer" while not having SharePoint Designer installed on the machine, leads to open the file in WebDAV protocol within the Notepad!)

Navigate to the Site Assets Library, and within the "Library" Tab of the Ribbon, locate the button called "Open With Explorer".


If you click on this button (be patient it takes time, and sometimes you have 2 warning pop-ups to close, and even to add the SharePoint Online domain in the trusted sites of your Internet Explorer) a Microsoft OS Explorer Window is opening where you can see the SharePoint files! (this is just amazing because actually the SharePoint files are stored, whether in the SharePoint content databases, or just as a link in the content databases pointing to the SharePoint server files system).
Note that this only works with Internet Explorer.
Now you can see the files within a Microsoft Explorer Window, you can as usual, right-click one of them, and choosing the option "Open with", open the file using WebDAV protocol with Notepad, Notepad++ or Visual Studio, or any HTML Code Source Editor of your choice.


2.5 Add Javascript and HTML code to the page in order to change automatically, the Logo, the css and the Master Page of the site.

Now we have to:
  • Reference the JQuery Library.
  • Create the code to brand and of course, unbrand the site.

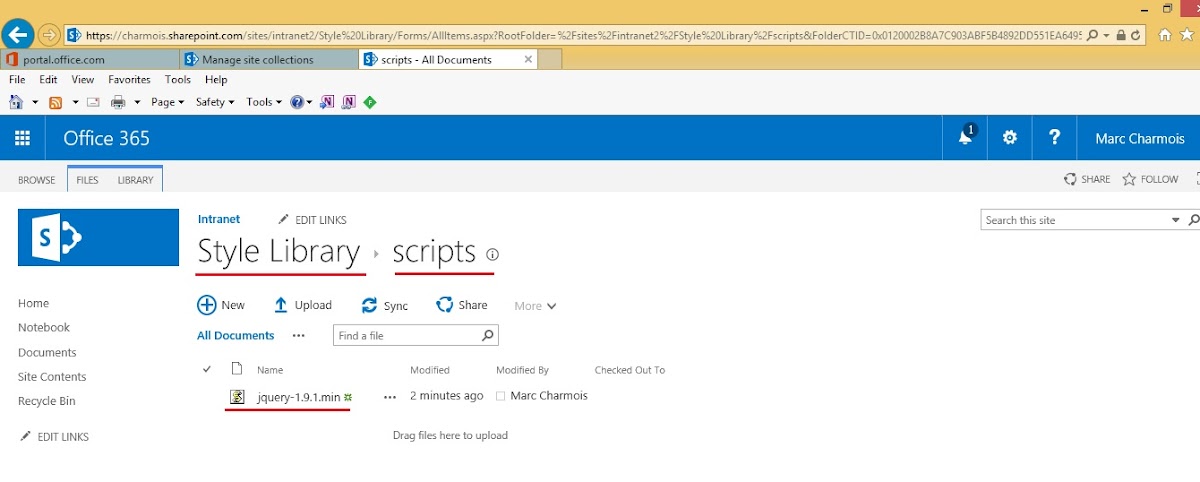
First, create a folder called "scripts" in the "Style Library" of the Site Collection and paste in it the jQuery-1.9.1.min.js. You can find this file within an Add'In (App) project created with Visual Studio. Any else jQuery library could be fine however, since we use just basic jQuery features in this tutorial code.


The complete source code of the brand-this-site.aspx Web Part Page and the .ccs file are available @ the dedicated GitHub repositery

Within your .aspx page open in the code source editor with WebDAV protocol, locate the last meta tag at the beginning of the page within "PlaceHolderAdditionalPageHead" section:

    <meta name="CollaborationServer" content="SharePoint Team Web Site" />
and ad the reference to the jQuery library.
Be careful to point to the right location depending of your Site Collection and Site Name. In my case, here is the code of the section within Visual Studio:
    <meta name="CollaborationServer" content="SharePoint Team Web Site" />
    <!-- Added using WebDAV mode by Marc Charmois --->
    <script type="text/javascript" src="/Sites/intranet2/Style%20Library/scripts/jquery-1.9.1.min.js"></script>
    <!--script type="text/javascript" src="/_layouts/15/sp.runtime.js"</script-->/script>
    <!--script type="text/javascript" src="/_layouts/15/sp.js"</script-->/script>
<!-- end of the WeDAV customization -->
<sharepoint:scriptblock runat="server">
Notice that I used to reference the JSOM libraries, but I stopped since there are referenced in the Web Part page source code of SharePoint Online.

Then, just below the <asp:Content ContentPlaceHolderID="PlaceHolderMain" runat="server"> opening tag, paste the JavaScript code and replace the paths to the files with the ones corresponding to your SharePoint Online team site:

<asp:Content ContentPlaceHolderID="PlaceHolderMain" runat="server">
    <script>

        function branding() {
            try {
                var context = new SP.ClientContext.get_current();
                var web = context.get_web();
                web.set_masterUrl('/sites/intranet2/_catalogs/masterpage/oslo.master');
                web.set_siteLogoUrl('/sites/intranet2/Style%20Library/images/Contoso-Blue.png');
                web.set_alternateCssUrl('/sites/intranet2/Style%20Library/CSS/Contoso.Intranet3.css');
                web.update();
                context.executeQueryAsync(onQuerySucceeded, onQueryFailed);
            } catch (error) {
                alert(error);
            }
        }

        function unBranding() {
            try {
                var context = new SP.ClientContext.get_current();
                var web = context.get_web();
                web.set_masterUrl('/sites/intranet2/_catalogs/masterpage/seattle.master');
                web.set_siteLogoUrl('/_layouts/15/images/siteIcon.png?rev=40');
                web.set_alternateCssUrl('');
                web.update();
                context.executeQueryAsync(onQuerySucceeded, onQueryFailed);
            } catch (error) {
                alert(error);
            }
        }

        function onQuerySucceeded(sender, args) {
            alert("The branding of your site was succesfully changed");
            window.location = window.location.href;
        }

        function onQueryFailed(sender, args) {
            alert('Request failed. ' + args.get_message() +
                '\n' + args.get_stackTrace());
        }

    </script>
    <div class="ms-hide">

Below the <webpartpages:webpartzone control, place the HTML code for the buttons:

    <div class="ms-hide">
        <webpartpages:webpartzone runat="server" title="loc:TitleBar" id="TitleBar" allowlayoutchange="false" allowpersonalization="false" style="display: none;" />
    </div>
    <br>
    <br>
    <a href="JavaScript:branding();" id="brand-button">Brand this site</a>
    <br />
    <a href="JavaScript:unBranding();"  id="unBrand-button">Unbrand this site</a>
    <table class="ms-core-tableNoSpace ms-webpartPage-root" width="100%">

Finally, just before the end of the ContentPlaceHolder PlaceHolderMain section paste the code for disabling the button that is useless depending on the site is branded or not:

    </table>
        <script type="text/javascript">
            var logoUrl =$(".ms-siteicon-img").attr('src');
      
            if (logoUrl.indexOf('Contoso') > -1) {
                document.getElementById('brand-button').disabled = "disabled";
                document.getElementById('brand-button').style.color = "silver";
            } else {
                document.getElementById('unBrand-button').disabled = "disabled";
                document.getElementById('unBrand-button').style.color = "silver";
            }
         </script>
</asp:Content>

2.6 Testing the page
After having copied the previous code at the right places within the Web Part page and well replaced the paths with the ones corresponding to the right locations of your environment you should obtain this scenario:
When you land on the page for the first time the site is not branded and the "Unbrand this Site" link-button is disabled:


If you click on the "Brand" button, you are soon warned that the customizations were successfully performed:


Then, when you close the Javascript alert pop-up, you are relocated onto the same page, but with the new site branding! And you can also see that the "Brand" button has been disabled while the "UnBrand" button has been enabled.


3 - Aknowledgements

Sunday, October 11, 2015

Branding a SharePoint Online Team Site

So, You have juste created your 30 days SharePoint Online trial environment, or have access to a licensed SharePoint Online environment and want to brand a team site.

From this...


to this, for example...


I am going to go through several ways to do it.First the "classical" one:
  1. First, you can use a custom master page, custom CSS, without packaging all this and obtain a result in a very quick time. (By the way, you can do it even faster by using the SharePoint Publishing Features but it is not the case for this post. I chose for this post not using the Publishing Features in consideration of people that bought a SharePoint Online environment where they are not available. I plan writing the same post while using the Publishing Features)
  2. You can, of course, package all your customizations done before within a .wsp also called a No-Code Sand-Boxed Solution (NCSS) and redeploy all
  3. And finally you can also use ShaePoint Add-Ins (formerly called Apps) for doing the same.
I will speak about these three ways of branding a SharePoint Online team site and will explain the pros and cons of each. In this post, I will go through the two first approaches that are the old ones, providing a step by step tutorial for carrying them out. I will dedicate a specific post for the last one (Add-Ins), but as I will explain further on in this post, Add-ins, regarding this topic (SharePoint Online Branding) and until further notice from Microsoft, are just an alternate choice with its own pros and cons.
As a matter of fact, Microsoft recommends to use Add-Ins whenever you can, but recommends NCCSs for branding as the easiest way to do it. (MSDN: SharePoint Add-ins compared with SharePoint solutions)

I will finish the post by referencing another post of mine that proposes a fourth approach. This last approach uses together, WebDAV customisations, the SharePoint JavaScript Object Model, while preserving the OOTB SharePoint templates used for the branding.
1 - Branding a SharePoint Online team site using webDAV
One of the most famous tool using webDAV protocol is SharePoint Designer, but you can open a SharePoint page in webDAV mode using notepad, notepad ++ or Visual Studio. style="color: #e9ab17; font-weight: normal; margin: 1px 0px; padding-bottom: 10px; padding-left: 26px; padding-top: 10px;"> 1.1 Creating and customizing the Intranet Home page
We are now going to create the home page of our Intranet Site and perform the first cusotmizations. Navigate to the Site Pages Library of your SharePoint Online Team Site.


Then, create a Web Part Page and name it home.


Stop editing the page and navigate to the "Site Assets" library. Notice the look of the Home Web Part Page with the default master page.


You will also notice that the Web Part Page was created in the "Site Assets" library.


Now is the time to open the page in webDAV mode to perform the first customization. Navigate through the page contectual menu and locate "Open with SharePoint Designer".


If you haven't SharePoint Designer installed on your computer, the source code of the page is displayed within the notepad.


You can notice the line where the Home Web Part Page is associated with the default.maser master page.

<%@ Page language="C#" MasterPageFile="~masterurl/default.master"

We are going to change the association and make the Home page depend on the oslo.master master page. So change the MasterPageFile attribute value with the relative path of the oslo.master master page. In my case, as my site is not the root collection site, I had to use the "/sites/Intranet" segments in front of the path of the master pages gallery:

<%@ Page language="C#" MasterPageFile="/sites/intranet/_catalogs/masterpage/oslo.master"

This is a view of the code of my Web Part Page after having performed the change.


Don't forget to save the changes, and when you refresh the page, you will notice that the layout of the page has completely changed...
This is due to the new association of the Home Web Part Page with the oslo.master master page.


1.2 Customizing the oslo.master master page in WebDAV mode
Now, we are going to customize the oslo.master master page to give the home page a look and feel corresponding to the famous Contoso company.
Use Bing or Google images to find a logo of the Contoso company. Try to find one based on a .gif with transparency. When it's done, create a folder called "images" in the site collection style library and download the Contoso logo image in the folder.


Don't forget to check in the logo image, in order visitors of the site will be able to see it. (if the logo image is checked out, only the administrator of the site will be able to see it).


Now, navigate to the master pages gallery and locate the oslo.master master page, and open it with SharePoint Designer (or the notepad as we did before for the Home Web Part Page).


While the source code of the oslo.master master page is edited within SharePoint Designer or the notepad, locate the line displaying the SharePoint online default logo:


<SharePoint:SiteLogoImage CssClass="ms-siteicon-img" name="onetidHeadbnnr0" id="onetidHeadbnnr2" LogoImageUrl="/_layouts/15/images/siteIcon.png?rev=40" runat="server"/>

Then change the line for displaying the Contoso logo you've just downloaded in the site collection style library:

<SharePoint:SiteLogoImage CssClass="ms-siteicon-img" name="onetidHeadbnnr0" id="onetidHeadbnnr2" LogoImageUrl="/sites/intranet/Style%20Library/images/Contoso-Blue.png" runat="server"/>/>

The Home page of the Intranet is now displaying the logo of the Contoso company:


Now, we can add CSS to our customized oslo.master master page. So, locate the end tag of the <head> section and paste the following styles:

<style>
#siteIcon{
margin-top:0px;
}
#titleAreaBox{
margin-top:0px;margin-left:20%; margin-right:20%;background-color:rgba(242, 242, 242, 1);
}
#titlerow{
background-color:rgba(242, 242, 242, 1);
}

.noindex, ms-core-listMenu-horizontalBox{
margin-top:30px; margin-left:-200px;
}

.ms-breadcrumb-box {
padding-top: 5px;padding-bottom: 5px;height:30px;
}
#SearchBox{
margin-left:200px;margin-right:-50px;
}
#suiteBarDelta{
margin:0px;margin-top:-30px;
}
#DeltaPlaceHolderSearchArea{
padding-top:45px;
}
.ms-srch-sb > input {
width: 140px;
}
</style>
</head>


And you will obtain this new look for the home page:


Now, I am going to explain the pros and cons of customizing SharePoint Online that way:

1.3 Pros and Cons regarding the customization of SharePoint Online using WebDAV mode (SharePoint Designer or other editors)
When you make changes on a SharePoint page (Web Part Page, Wiki Page, Master Page) using webDAV protocol the link between the page and the OOTB template which the page is based on is temporary broken. The page which you have made changes on, goes in the SharePoint content databases.
These kinds of pages where you have performed changes using webDAV and stored in the SharePoint databases were called until 2010 "unghosted" pages and was renamed since 2010 in "customized" pages.
Notice that you obtain exactly the same result when you download a page directly in a SharePoint library (Site Pages, Site Assets, Master pages gallery)

On the opposite a page based on a template remaining on the SharePoint Farm servers was called until 2010 a "ghosted" page, and since 2010 an "uncustomized" page. There are two kinds of uncustomized pages: the OOTB SharePoint pages of course, but also the pages deployed to a SharePoint Farm or Site Collection by using a SharePoint solution (.wsp) and activated in a SharePoint library using a SharePoint Feature.

So, the cons of branding a SharePoint site (on prem or Online) using webDAV protocol are roughly the same than using "customized" pages:
  • Your customizations are not stored in a Source Code Control System, so your customizations are hardly maintainable.
  • There is a feature in SharePoint Called "Reset to site definition" that fixes the broken link with the SharePoint template remained on the servers. This feature restore the "customized" or "unghosted" page to its original "uncustomized" or "ghosted" state. But using "Reset to site definition" and restoring the page in its original state will also lead to the loss of all your customization! Very unsafe.
  • As your customized pages are not based on a OOTB SharePoint template anymore, if Microsoft makes any update on the SharePoint templates, these updates won't be taken into account by your customized page. You will lost new features of the product and maybe even current ones depending on the Microsoft updates.
  • Last, because the customized pages are stored in the SharePoint content databases, some says that using these kinds of pages leads to a loss of performances. I am not sure if it is true or not.

Facing all these cons regarding the use of the webDAV protocol to give a SharePoint Online site a personal look and feel you are certainly thinking: "Why doing this that way?" So here are the pros, and there are also many:
  • It is very quick and cheap. You know the main IT key success factor : Time to market! Customizing SharePoint that way allows you to provide your management or your customer with a very quick response to their requirements. It is cheap not only because it's quick done, but also because there is no need that people doing it to be "expensive SharePoint experts". A good web designer, doing it that way, will acquire the necessary knowledge to brand any SharePoint Online site within a few weeks.
  • If you are working within an well structured organisation, an organisation good at formalizing processes, all this can be done safely: keeping an history of all the customizations, keeping a copy of all the modified files in a Source Code Control System,etc. I recently helped a big French bank in setting up all these processes and performing a part of them automatically.
  • Last but not least, customizing a site using webDAV can lead to a "cleaner" way of delivering the solution, without modifying or losing the work already done. It could be just a first round of a project in order to provide your stakeholders with the rough website layout. This can be properly repackaged when the stakeholders are (finally) ok for the look and feel of the site. I advice any SharePoint developer to start working on a branding project using webDAV, then, package the customizations when they obtain the go from their management or client.
    Packaging operations and deployments for SharePoint are expensive in matter of efforts and time. Saving this precious time at the beginning of the project will lead to a more cost effective way of customizing SharePoint.
So let me show you now, how to repackage and redeploy ("properly") all the previous customizations:

2 - Branding a SharePoint Online team site using Visual Studio and No-Code Sand-boxed Solutions (NCSS)
2.1 Establishing the To Do list
So, let's summarize the customizations performed in webDAV mode :
  • we have created a custom Web Part Page and customized it by referencing an alternate Master Page.
  • we have customized the oslo.master Master Page by adding custom CSS within a <style> tag in order to use it as an alternate Master Page.
  • we have downloaded the logo image within a new "images" folder of the "styles" library

What have we to do in order to be more compliant with the usual practices? We have to :
  • Package the custom Web Part Page and deploy it using a No-Code Sand-boxed Solution
  • Package the custom Master Page based on the native oslo.master Master Page in the same NCSS package and by the way, after having deployed the package, reset to site definition the customized oslo.master Master Page in order it returns to its original "uncustomized" state.
  • do nothing for the image logo, because it is ok to download directly the logo image within a new "images" folder within the "styles" library, so let it done as it's already done.
  • put the CSS embedded in the custom Master Page in a .css file and download it in the Styles library (same treatment than the logo image)
So, let's do it, and after of course, I will explain the pros and the cons of customizing a SharePoint Online site using No-Code Sand-boxed Solutions or NCSS.
What do we need for doing this?
At least, a computer with Visual Studio 2013 installed on it. The best is to have a virtual machine where SharePoint 2013 and Visual Studio are installed. I have a post explaining how to install this kind of environment (plan at least one day of work for mounting such an environment)
Of course, you can build your NCSS package using Visual Studio and publish it directly from Visual Studio within SharePoint Online, but in case of errors it would be difficult to debug.


2.2 Checking the environment and creating the project

First of all, be sure to have a SharePoint site on your on premise environment with the same acces URL than in that your SharePoint Online. If not create it.


Then, continue by opening Visual Studio and creating the project. A SharePoint 2013 Empty Project will be fine.


Type the URL of your on premise SharePoint Site as the site used for debugging, and choose to deploy your project package as a Sandboxed Solution since the final aim is to deploy this package within SharePoint Online.


The next screenshot shows Visual Studio after the project is created.


2.3 Creating the Module Feature

Right click the Feature Folder and click Add Feature.


After the feature is created, rename all that you can in order your project to be understandable for anybody who would have to open it or maintain it. The title will be displayed within the SharePoint UI, so find an really explicit name. I should have rather called my Feature "Contoso - Add Intranet Pages".
Notice that I gave a "Site" scope to my feature since it has to register a Master Page, and that the Master Page gallery is at the Site Collection level.


Then, right click the project and navigate in order to Add A New Item.


As said before, name the module so as anybody can understand its utility


The next screenshot shows Visual Studio after the module is created.


You can also notice that the module has been automatically added to the previously created Feature.


2.4 Adding a Master Page to the Module Feature

Right click the sample.txt file and rename it "Contoso.Intranet.master", then click "Yes" to the message that warns you that you are changing the extension.


After having renamed the file, you will notice that Visual Studio has changed the icon into an icon of a Master Page file, and that the file element.xml of the module has been updated.


Click on the Contoso.Intranet.master within Visual Studio to edit the source code of the page. For now, you see only the text of the previous txt file.


Now, we are going to copy the source code of the oslo.master Master Page that we have previously customized in webDav mode. So go to your SharePoint Online environment and open the oslo.master using webDav protocol, and copy the source code.


Then, paste the code in the Contoso.Intranet.master file edited within your Visual Studio. You can see now the code you have modified in webDav mode colorized by Visual Studio.


2.5 Moving the css from the Master Page to a dedicated .css file

Now, as said before, we are going to put the CSS currently present in the Master Page in a dedicated .css file, so using the Module contextual menu: "Add --> New Item", add a new css file to your Module. Take care as usual giving the .css file an explicit name.


So, locate the custom styles added before in WebDAV mode in the oslo.master Master Page, and cut them...


then, paste them in the new .css file that you have just created...


finally, delete the empty <style> section in the Master Page


2.6 Registering the .css file within the Master Page

But now, we have to register the .css file within the new master page. To do it, the best is to use the SharePoint control <SharePoint:CssRegistration. So, locate the current <SharePoint:CssRegistration control and duplicate it.


Notice that, if you click on the control within Visual Studio, you have the control properties displayed within the properties windows, and you can see a property called "After". This property allows you to give an order regarding the way the <Link html tag are rendered. This is important beacause we want that our custom css to be rendered after the SharePoint native ones because we want our custom css to overwrite the SharePoint native ones.
That is why I gave to the control ("Name" property) the URL I planned for the custom css (not deployed yet) and I specified "oslo.css" for the value of the property "After".


2.7 Creating the new Home page for the Intranet site

Now, we are going to create the new home page for the Intranet site, so use again the conextual menu of the Module element for adding a New Item. As there is no .aspx file available in the Visual Studio templates, choose an HTML page and add it to the Feature Module. The trick is to change the extention in .aspx in the modal window...


...in order to obtain a .aspx file recognized as well by Visual Studio:


As we did before for the master page, we are going to paste the source code of the previously modified Home Page (Home.aspx) within SharePoint Online using webDAV protocol.
So, open the Home.aspx in webDAV mode and copy the source code.


and paste this customized code within the freshly created Contoso.Intranet.Home.aspx


But now, we have to change the reference to the master page since we want to use the custom Master Page we have just created in Visual Studio (Contoso.Intrant.master), so change the reference within the home page.


Note
1 - Note that referencing the Masper Page directly within the source code of the Home page allows me to create a customized part of the site dedicated to the visitors while preserving the back-office pages from any customizations. (You don't need to do this for a publishing site since there is already two Master Pages to do this).
2 - For referencing the Master Page I should rather have declared: ~site/_catalogs/masterpage/contoso.intranet.master so as the package could be deployed within any site collection.

2.8 Updating the Module element.xml file to prepare the registration of the pages within the SharePoint libraries at the Feature activation time

Now we have to specify the libraries Url where we want our pages to be registred when activating the feature. Here is the code :

xml version="1.0" encoding="utf-8"?>
<Elements xmlns="http://schemas.microsoft.com/sharepoint/">
  <Module Name="Module Pages">
    <File Path="Module Pages\Contoso.Intranet.master" Url="_catalogs/masterpage/Contoso.Intranet.master" />
    <File Path="Module Pages\Contoso.Intranet.Home.aspx" Url="SiteAssets/Contoso.Intranet.Home.aspx" />
  </Module>
</Elements>
and the Visual Studio screenshot:


Notice that I removed the reference to the .css file since we decided before (while doing the to do list) that we will deploy the .css file by downloading it directly in the style library.

2.9 Testing the deployment of the No-Code Sandboxed Solution (NCSS) within the development environment

Now, we are going to test if everything is deploying well with the solution we have just built. So, right click your project in Visual Studio and locate "Deploy Solution" in the contextual menu.


Visual Studio deploys your solution in sandboxed mode, activates the feature and warns you that everything is ok.


Now we have to check that everything is really ok. So, first go to the site collection Solution Store to check if the Solution is well deployed and activated.


Yes it is ! Now we are going to check if the Feature is well activated.


Yes it is. The feature is present and well activated ! Let's check if the master page is well registred in the master pages gallery


That's ok too. Good ! And last, the Home page in the Site Assets library...


That's good also. But when trying to display the home page we have this error :


But you can see what ressource is missing in the source code of the error page (a trick I found 7 years ago and that is still working!) (By the way in the post you have also the trick to activate the displaying of errors)


So, the error page HTML source code says that "The file /_controltemplates/15/HelpPanel.ascx" is missing. This perfectly normal. Why ? Because we pasted code used for SharePoint Online the 12th of October 2015 within a page displayed by an older version of SharePoint 2013 on Premise. It is normal that elements are missing in my development environment.
By the way, if you check well the source code of SharePoint Online by opening the pages in webDAV mode you will notice that the 12th of October 2015, SharePoint Online is already using the 2016 version of the product! Just look:

<%-- _lcid="1033" _version="16.0.4524" _dal="1" --%>
<%-- _LocalBinding --%>
<%@ Page language="C#" MasterPageFile="/sites/intranet/_catalogs/masterpage/contoso.intranet.master" Inherits="Microsoft.SharePoint.WebPartPages.WebPartPage,Microsoft.SharePoint,Version=16.0.0.0,Culture=neutral,PublicKeyToken=71e9bce111e9429c" %>
<%@ Register Tagprefix="SharePoint" Namespace="Microsoft.SharePoint.WebControls" Assembly="Microsoft.SharePoint, Version=16.0.0.0, Culture=neutral, PublicKeyToken=71e9bce111e9429c" %>
<%@ Register Tagprefix="Utilities" Namespace="Microsoft.SharePoint.Utilities" Assembly="Microsoft.SharePoint, Version=16.0.0.0, Culture=neutral, PublicKeyToken=71e9bce111e9429c" %>
<%@ Import Namespace="Microsoft.SharePoint" %>
<%@ Assembly Name="Microsoft.Web.CommandUI, Version=16.0.0.0, Culture=neutral, PublicKeyToken=71e9bce111e9429c" %>
<%@ Register Tagprefix="WebPartPages" Namespace="Microsoft.SharePoint.WebPartPages" Assembly="Microsoft.SharePoint, Version=16.0.0.0, Culture=neutral, PublicKeyToken=71e9bce111e9429c" %>


All the SharePoint .dll are from the 16.0.0.0 version ! So the code from SharePoint Online you paste in pages deployed in a SharePoint 2013 environment cannot work. Not a big deal. We were able to check that the deployment was ok. So let's deploy on SharePoint Online now.

2.10 Deploying the solution within SharePoint Online

Now is the time to deploy within SharePoint Online. Thus, go to the "debug" folder of your Visual Studio project, and locate the .wsp file.


Then navigate to the Solution Store of your SharePoint Online environement and download the .wsp.


Then, activate it and you should obtain the following screenshot:


2.11 Testing the deployed solution within SharePoint Online

Now, just check that the master page is well registred in the master pages gallery:


and the same for the home page :


and check that the page is displaying well, not like in the SharePoint on premise environement:


Ok, that's good, although the css styles are missing because we haven't deployed them yet. Let's do it. Go back to your Visual Studio project and locate the .css file.


Then drag and drop the file in the css folder of your SharePoint Online style library at the site collection level.


You can see that the .css file has been properly added within the folder, but it is checked out so only administrator will be able to see it. We have to check in it.


When it's done, you finally can display the home page of your Intranet properly!


And the page and the master page are this time perfectly ghosted because they were deployed by a .wsp and activated by a SharePoint Feature. However, our work is not finished yet, because we have to do cleaning operations in our SharePoint Online environment.
By the way, if you take a look at the html source code of the page you can see how our SharePoint control <sharepoint:cssregistration has rendered the HTML <Link> tag properly, placing the custom css just after the SharePoint native ones...


Note
Note that you can also publish the No-Code Sandboxed Solution (.wsp) directly to SharePoint Online. Here is the official MSDN "How To".

2.12 Cleaning our SharePoint Online environment
  • deleting the old "unghosted" home page
First operation, let's delete the customized (unghosted in webDAV mode previously) Home.aspx page since we have now the same page perfectly ghosted.


  • renaming the new "ghosted" home page
Secondly, we can now rename the ghosted Home page with the same name than the page (unghosted) we have just deleted. You will see that not only the display name of the page has changed, but also the name in the URL.

Note
Note that if you deactivate and reactivate the feature that has registered the page, you will have a new home page again, you will be able to rename this page and by doing the same operation again you will have a workaround for "provisioning" a lot of pages based on the same template.


  • reseting the customized (unghosted) oslo.master to site definition

This is the last cleaning operation. Previously, we have modified the oslo.master Master Page using WebDAV protocol and, as a result, this Master Page, that is a native page of SharePoint Online has been temporary placed in an unghosted state. We have to fix this in order this native page recover its original uncustomized (ghosted) state.

First, we need the Url of the page. This is a trick to get it. Go to the Master Page Gallery of your SharePoint Online site collection and display the properties of the oslo.master Master Page.
You will have a link to the Master Page displayed so as you be able to copy it as a shortcut.


Then, go to the Site Settings of your Site Collection, and you will find a link under the "Site Actions" section called "Reset to site definition". Click this link.


Paste the link to the customized oslo.master Master Page that is currently in your clipboard within the text-box.


You are warned that you could lose all the modifications performed outside the browser (aka in WebDAV mode, SharePoint Designer and so on...). We can lose these modifications because we have durably stored them in a package and they are currently deployed in our SharePoint Online site via the .wsp (No-Code Sandboxed Solution or NCSS).


After having reset the oslo.master Master Page to its original template, if we reopen it using WebDAV protocol we notice that all the custom styles that we have placed within it before were totally removed!


Of course close the page open in WebDAV mode without saving it or it will be customized again...

  • Making Home.aspx the actual Home Page of our Site
Now we have to set the Home.aspx page as the Home Page of our site. You have this feature in the Page Ribbon. Just click the button.


Now, if you type the Url of your site within a browser you will land directly on this Home page.

  • Last test for the Home Page
We have finally to test if the Home page is really working well and if we can add text to it... Good move because I noticed that custom styles have partially disturbed the proper functioning of the script editor Web Part and I had to add a <DIV> tag to tune the margin of the rendered text.


But I finally could display a satisfying message within our Home page based on a custom but ghosted Web Part page, a custom but ghosted Master Page, custom Logo and .css files, with all that properly deployed!


Updated 2015 October 16

I finally fixed the css for a better displaying of the pages:

#siteIcon{
margin-top:0px;
}
#titleAreaBox{
margin-top:0px;
margin-left:20%;
margin-right:20%;
background-color:rgba(242, 242, 242, 1);
}
#titlerow{
background-color:rgba(242, 242, 242, 1);
}
/*.noindex, */
.ms-core-listMenu-horizontalBox{
margin-top:30px;
margin-left:-200px;
}
.ms-breadcrumb-box {
padding-top: 5px;
padding-bottom: 5px;
height:30px;
}

#SearchBox{
margin-left:200px;
margin-right:-50px;
}
#suiteBarDelta{
margin:0px;
margin-top:0px;
}
#DeltaPlaceHolderSearchArea{
padding-top:45px;
}
.ms-srch-sb > input {
width: 140px;
}


2.12 The pros and cons of using No-Code Sandboxed Solutions (aka NCSS) for customizing SharePoint Online

  • The Pros
    • Compared with Add-Ins: Although the new Add-Ins model for SharePoint (formerly called Apps) is documented by Microsoft as the the recommended way for customizing SharePoint, the No-Code Sandboxed Solutions (NCSSs) are still supported. More than that, you can see in the official MSDN documentation that among the scenarios recommended by Microsoft for using No-Code Sandboxed Solutions instead of Add-Ins (formerly called Apps), Branding of SharePoint Sites is one of them:

      [... SharePoint users often want to give their SharePoint sites, including their SharePoint Online sites, a custom appearance with their own colors, styles, layouts, and logos. This is generally easier to do with NCSSs than with SharePoint Add-ins.
      ...] MSDN SharePoint Add-ins compared with SharePoint solutions

      Notice that the documentation was updated August 12, 2015. Here is another interesting link on this topic: There is a big confusion currently between the SharePoint 2010 Sandboxed Solutions (not supported) and the No-Code Sandboxed Solutions (still supported).

      But NCSSs compared with Add-Ins are not only an easier way for branding a SharePoint Online site. Regarding branding, Add-Ins are more limited:

      [...
      A SharePoint Add-in has declarative control over the appearance of only its own add-in web. For the host web, it can declaratively add only ribbon buttons and menu items (and add-in parts). Any other changes to a host web or its parent site collection, tenancy, or on-premisesSharePoint web application has to be done with code or script that uses one of the SharePoint's client object models. For example, new icons or CSS files would have to be programmatically deployed. This code could be run from the add-in itself after it is installed, or it could run in the add-in installation event handler. But it would take a considerable amount of work to create this code.
      In addition, the add-in would need site collection-scoped permissions to change any websites outside its own add-in web and host web, and it would need tenant-scoped permissions to change more than just its parent site collection. A branding NCSS, however, can be deployed and activated to any site collection; and it could consist of only a few purely declarative components.
      ...] (MSDN)

    • Compared with customizations done using WebDAV protocol: your customizations are easily maintainable and there is few risks to lose them because they were developped with Visual Studio, so they can easily be stored in a Source Code Control System (like Team Foundation Server) and they are all gathered within a single or a few packages: .wsp based on No-Code Sandboxed Sollutions (NCSS)
    • Compared with customizations done using WebDAV protocol: With a deployment using No-Code Sandboxed Solutions, the customized pages are not stored in the SharePoint content databases like these customized using the WebDAV protocol, they seem to be stored under this location within all the SharePoint servers of a SharePoint Farm:
      C:\Windows\Microsoft.NET\Framework\v4.0.30319\Temporary ASP.NET Files\root\
      Some says that using pages based on templates stored within the file systems of the SharePoint servers leads to a gain of performances. I am not sure if it is true or not.

  • The Cons
    • Compared with customizations done using WebDAV protocol: It's longer (you can realize that just by comparing the lists of necessary operations to both approaches as described in this article). It requires developers knowing SharePoint well so it's also more expensive.
    • Compared with Add-Ins (formerly called Apps): As your customized pages are not based on a OOTB SharePoint template anymore, if any update of the SharePoint templates is performed by Microsoft, these updates won't be taken into account by your customized page. You will miss new features of the product or maybe even lose current ones depending on the Microsoft updates. So you might perform sometimes unexpected maintenance operations for recovering all the features of the SharePoint product. (it might not be the case with custom master pages based on the use of the Design Manager with which you can convert an.html file into a SharePoint 2013 master page, a .master file. I have to check this more seriously. By the way, I planned to redo the same post using the SharePoint Publishing Features).

3 - Branding a SharePoint Online team site using Add-ins (formerly called Apps)

As said at the beginning of the post, I have explained the two first approaches that are the classical ones. I will dedicate a specific post (to be published soon) for describing all the steps necessary to carry out the last approach (Add-Ins). But don't forget that Add-ins regarding this topic (SharePoint Online Branding) and until further notice from Microsoft, are just an alternate choice with its own pros and cons.
As a matter of fact, Microsoft recommends to use Add-Ins whenever you can, but recommends NCCSs for branding as the easiest way to do it. (MSDN: SharePoint Add-ins compared with SharePoint solutions)

Regarding this approach, you can already check the material available on the Office 365 Developer Patterns and Practices:

Alternate CSS and set site logo

Or directly the associated source code for the Add-In

You will notice that in the Office 365 Developer Patterns and Practices sample, the Add-In :
  • Change programmatically (Imperative approach) the logo and the CSS references for the site
    
                
                web.AlternateCssUrl = web.ServerRelativeUrl + "/SiteAssets/contoso.css";
                web.SiteLogoUrl = web.ServerRelativeUrl + "/SiteAssets/pnp.png";
                web.Update();
                web.Context.ExecuteQuery();
    
    
  • Upload programmatically (Imperative approach) the logo and the CSS files for the site
    
                // Use CSOM to upload the file in
                FileCreationInformation newFile = new FileCreationInformation();
                newFile.Content = System.IO.File.ReadAllBytes(cssFile);
                newFile.Url = "contoso.css";
                newFile.Overwrite = true;
                Microsoft.SharePoint.Client.File uploadFile = assetLibrary.RootFolder.Files.Add(newFile);
                web.Context.Load(uploadFile);
                web.Context.ExecuteQuery();
                
                // Get the path to the file which we are about to deploy
                string logoFile = System.Web.Hosting.HostingEnvironment.MapPath(string.Format("~/{0}", "resources/pnp.png"));
                
                // Use CSOM to upload the file in
                newFile = new FileCreationInformation();
                newFile.Content = System.IO.File.ReadAllBytes(logoFile);
                newFile.Url = "pnp.png";
                newFile.Overwrite = true;
                uploadFile = assetLibrary.RootFolder.Files.Add(newFile);
                web.Context.Load(uploadFile);
                web.Context.ExecuteQuery();


Thus, that leads to finally examine the pros and cons of using Add-Ins for branding a SharePoint Online team site:
  • The pros
    • Compared with NCSSs, no impacts regarding Microsoft updates:
      As Add-Ins are using imperative approach (doing things programmatically) the OOTB templates of SharePoint (Web Part Page Templates, Page Layouts, default.aspx page, Master Pages) are preserved so as any update from Microsoft regarding these templates will have no impacts on the customizations performed using Add-Ins. That is to mean: no custom Master Page anymore, no CAML anymore, ever!
  • The cons
    • Compared with NCSSs: NCSSs are more powerful:
      As Add-Ins are using imperative approach (doing things programmatically) and NCSSs can use both imperative (Client side of course with SharePoint JavaScript library code) and declarative approach (modifying HTML, CSS within the custom templates and CAML for deploying and registering these custom templates in the libraries), there are numerous things that you can do with NCSSs that you cannot do using Add-Ins. That is to mean: custom Master Pages, custom pages, with all the HTML and the server controls you want within the custom pages.
    • Compared with NCSSs: Add-Ins require more time and more knowledge:
      Add-In model is completely new and different from classical approaches, thus technical team will have to enhance knowledge to be really comfortable with these new approaches. As said in the MSDN documentation when using Add-Ins remote imperative approach "it would take a considerable amount of work to create this code".
      Not only the SharePoint team will be involved, but also people working in the infrastructure and network areas because setting the necessary things regarding network and authentication for getting Add-ins work properly in a company requires also time and knowledge.
4 - Branding a SharePoint Online team site using a customized Site Page and the SharePoint JavaScript Object Model

As said at the beginning of that post, there is also a fourth approach that mixes all the ones we have examined. Roughly, you open a Web Part page of the SharePoint Online team site using WebDAV protocol, and you paste within the code source of the page the instructions to change the css, logo, and Master Page of the site based on the SharePoint JavaScript Libraries.
Doing things that way, you are compliant with the new recommendations of Microsoft (avoid creating custom templates) but you don't have to go trough the steps needed to package and deploy an Add-In that can be expensive in a matter of time an knowledge.

Here is the special post dedicated to this topic: Branding a SharePoint Online team site using the SharePoint JavaScript Object Model