Creating and deploying a Reporting Services 2008 report bound to an SQL
Server 2008 Analysis Services Data Source in SharePoint 2007
Introduction
The
goal of this tutorial is to show how to use an SQL Server 2008 Analysis Services
Database to generate an SQL Server 2008 Report and how to deploy it in
SharePoint 2007.
So we are going to use together three of the most famous Microsoft products at the moment:
- SQL Server Analysis Services 2008
- SQL Server Reporting Services 2008
- SharePoint 2007
I have written SharePoint 2007 on purpose since this tutorial is usable both for MOSS 2007 and Windows SharePoint Services 3.0. As we use SQL Server Reporting Services 2008 AND SharePoint 2007, SSRS 2008 has of course been installed in SharePoint Integrated Mode.
Prerequisites
- You have a complete environment to generate and deploy reports with SQL Server Reporting Services 2008 in SharePoint Integrated Mode, so including SQL Server Reporting Services 2008, SharePoint 2007 and BIDS.
- You have installed SQL Server Analysis Services 2008 on this environment
- You have installed SQL Server 2008 Databases Samples Adventure Works
If you miss any of these features you can find within that blog, articles describing the required steps with screen shots and references to MSDN and Technet documentation to install and configure them either in a single or a multiple server environment.
(See previous posts January, February, March 2009. this is the first article of the serie: Integrating Reporting Services 2008 with SharePoint 2007 Step 1 - SQL Server 2008 Installation )
Tutorial overview
The
first step of this tutorial is quite long because you have to perform the several operations
described in the Technet Analysis
Services Tutorial.
Then using the BIDS Report Wizard you will create a
Report bound to an SQL Server 2008 Analysis Services datasource.
You will then deploy it in
SharePoint 2007 and check the deployment within a SharePoint site.
The
required steps are the following:
Step 1 Analysis Services
Tutorial
Step 2 Analysis Services Tutorial checking
Step 3 Creating
Reporting Services Project
Step 4 Selecting the data Source
Step 5
Designing the Analysis Services Query
Step 6 Passing through next 3 Wizard
dialogs
Step 7 Defining Deployment Locations
Step 8 Closing the
Wizard
Step 9 Report changes and preview in BIDS
Step 10 Defining the
report Datasource location in BIDS
Step 11 Deploying the report in SharePoint
2007 with BIDS
Step 12 Checking the report deployment in SharePoint
2007
Step 1 Analysis Services Tutorial
Using
your environment including the 2008 Databases Samples Adventure Works, do the Technet Analysis
Services Tutorial.
You can stop at the end of Step 3 (browsing the
Deployed Cube) that is a good initiation to SSAS 2008 and is enough to generate
a significant report and deploy it in SharePoint.
Step 2 Analysis Services Tutorial checking
At
the end of the step 3 of the tutorial you should have:
The following view
in the Analysis Services database.

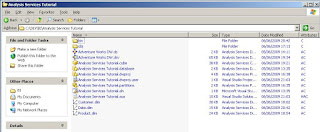
The following items
in the project folder.
The following in
BIDS.

Step 3 Creating Reporting Services Project
Open
BIDS, in File menu point "New “, click “Project"
Choose a Report Server
Project Wizard and name this AnalysisServicesBasedReport

Step 4 Selecting the data Source
On
"Select the Data Source" windows, choose Microsoft SQL Server Analysis Services
as the data source type.

Then click the "EDIT" button to
display the "Connection Properties" modal dialog.
In the "server name" text
box type the name of your database server where your Analysis Services 2008
database is located.
When the complete name is defined, you will see in the
"Select or enter a database name" drop down list the name of the Analysis
Services 2008 database corresponding to the Analysis Services Tutorial:
"Analysis services Tutorial".
Select this database and optionally test the
connection.

Click
OK to close the modal dialog and you will see appear your connection string in
the corresponding field of the main dialog.

Step 5 Designing the Analysis Services Query
Click
"Next" to display the "Design the Query" dialog.

Click the
"Query Builder..." button to open the Query Builder.
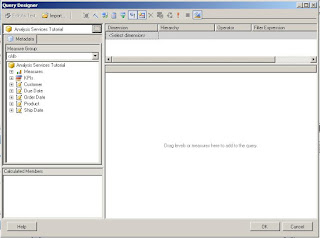
Notice that you are now
within a SQL Analysis Services 2008 environment since you can see a cube with
its measures, KPIs and dimensions.
On
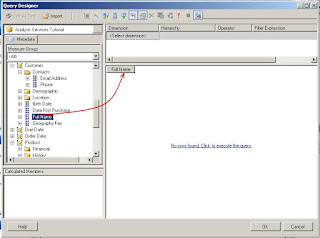
the Metadata pane expand Customer dimension and drag and drop the Full Name
field in the right pane.
Do the same with the "Product name" field of the
"Product" dimension.

Then
end by drag and dropping the "Sales Amount" item of the "Internet Sales" folder
located beyond the Measures node of the "Analysis Services Tutorial" cube.
You will notice that the values will be automatically populated.

We
are now going to filter the Data using the Dimensions.
In Customer Dimension
expand "Location" folder and drag and drop State-province to the Top Right
pane
Then expand the "Filter Expression" drop down list, and check the
checkbox for "Oregon".
You will notice that a first filtering operation is
automatically performed.

Then
in the "Order Date" dimension, expand "Order Date English Month Name", then
expand English Month Name and drag and drop "February 2002" just bellow
the "State-province" Filter row. As before, the filtering operation runs
automatically and you will see only 6 rows left.

Click
OK to close the "Design the Query" dialog.
You are taken back to the "Design
the Query" dialog and can see the Query string generated by the Query
Builder.

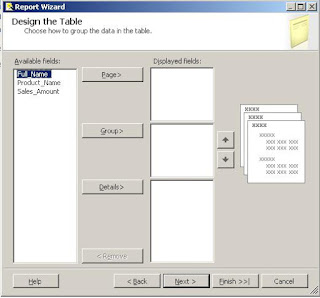
Step 6 Passing through next 3 Wizard dialogs
Then
click "Next" three times in order to arrive to the "Choose the Deployment
Location" dialog.
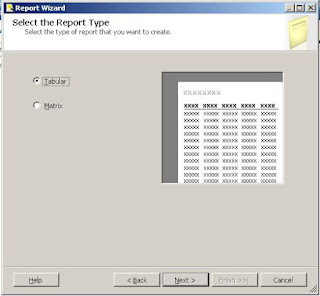

Step 7 Defining Deployment Locations
On
the "Choose the Deployment Location" dialog, as we are planning to deploy the
report based on the SQL Server 2008 Analysis services database, in a SharePoint
2007 document library, we are in the case of an SQL Server 2008 Report Server
running in SharePoint integrated mode and we have to type the following in the
two input boxes:
Report server:
The SharePoint Site. Notice that if,
as in my screenshot your site is the root web site of a root site collection the
URL is the same than the Web Application Url
--> http://yourMachineName:portNumber
Deployment folder:
We have to type the URL of the document library
where we plan to deploy the report. For example if your document library root
folder name is Adventure Works Reports
--> http://yourMachineName:portNumber/adventure
works Reports

Step 8 Closing the Wizard
Then
in the last dialog "Completing the Wizard", we can name our report,
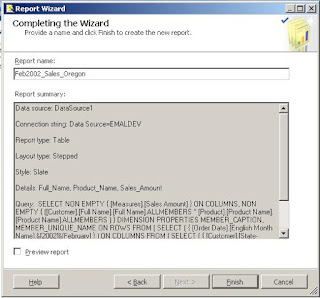
and
after having clicked "Finish" the usual BIDS environment is opening and we can
see the report in design mode.

Step 9 Report changes and preview in BIDS
In
design mode we can change the report name and the column names to display
friendlier names.
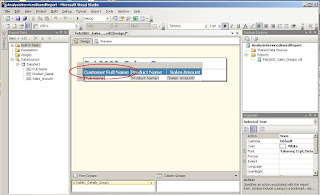
Then
we can switch to "Preview" mode to check our modifications.

Step 10 Defining the report Datasource location in BIDS
We
have now to deploy the report but before deploying it we have to define the
datasource location in SharePoint.
So, open the project properties dialog by
right-clicking the project name and clicking properties.
In
the opening "AnalysisServicesBasedReport Property Pages" dialog, in the
TargetDataSourceFolder, copy and paste the URL present in the TargetReportFolder
field.

Step 11 Deploying the report in SharePoint 2007 with BIDS
Then
in the BIDS Solution Explorer, right click the project name again and click
"Deploy".
In the BIDS Output Pane, you can check the deployment status.

Step 12 Checking the report deployment in SharePoint 2007
You
can now open your SharePoint document library to check the presence of your .rdl
file.

And
finally click the .rdl in order to display the SQL Server Reporting Services 2008 Report based on an SQL Server
Analysis Services 2008 Datasource in the RSViewerPage.aspx page within a Sharepoint 2007 site.


